
A sweet‑and‑savory, protein‑packed bowl that keeps you fueled all week long.
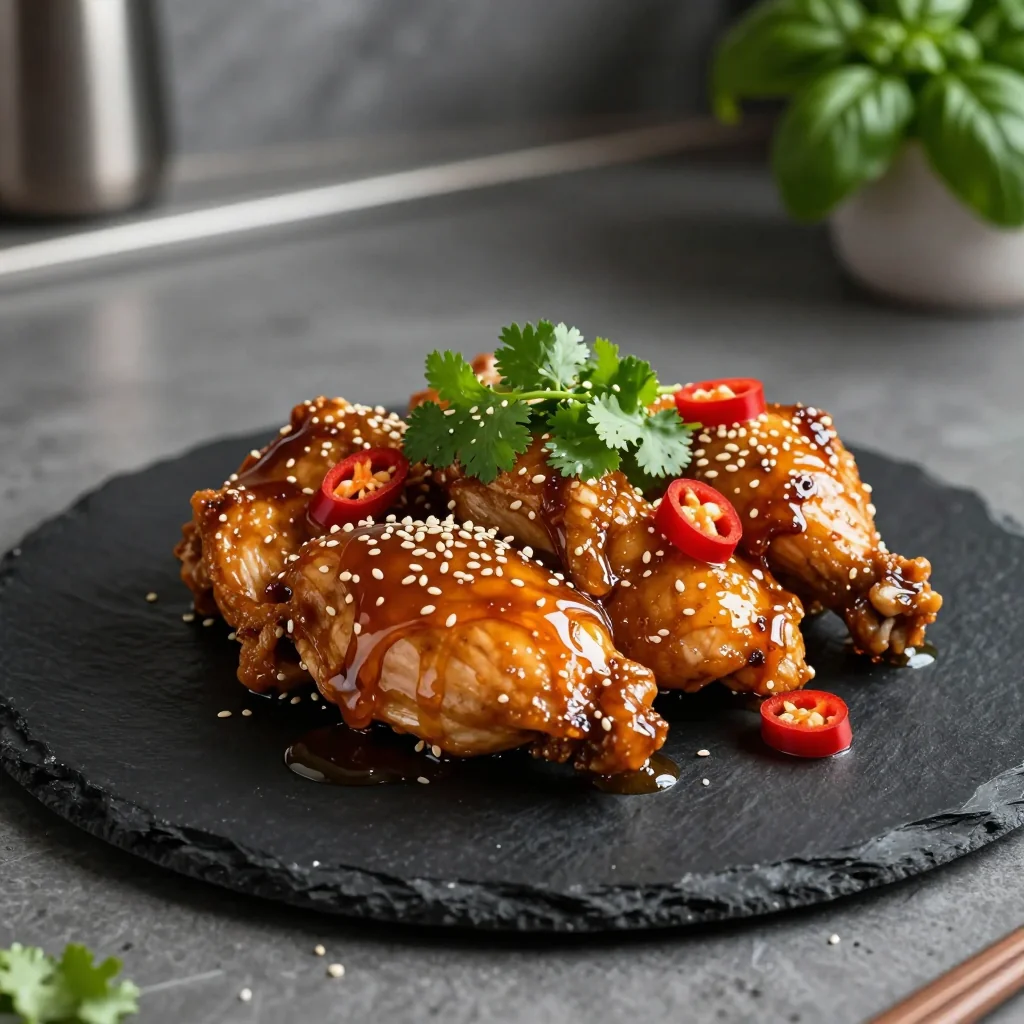
When I first tasted a sticky honey‑garlic chicken wing at a bustling night market in Bangkok, the caramelized glaze clung to the meat in a way that felt almost magical. The sweet, buttery notes mingled with a gentle heat, and I knew I had to bring that experience home. Over the years, I’ve refined the technique, swapping the wing for a lean chicken breast and pairing it with wholesome grains and crisp veggies to create a balanced, make‑ahead bowl.
This recipe draws inspiration from Asian street food while respecting the convenience of modern meal‑prep. The glaze is a simple blend of honey, soy, and a hint of sriracha, creating that perfect balance of sweet, salty, and spicy that makes every bite unforgettable.
In the next few minutes, you’ll learn how to achieve a glossy, caramelized coating, how to prep the rice and vegetables for optimal texture, and how to store everything so the flavors deepen overnight. By the end, you’ll have a set of four ready‑to‑grab bowls that keep you satisfied from Monday through Thursday.
Let’s dive in together and make your kitchen smell like a fragrant Asian market!
🌟 Why This Recipe Will Win Your Heart
Sticky Honey Garlic Chicken Meal Prep Bowls combine bold flavors, nutritional balance, and effortless convenience—all in one vibrant package.
- ✨ Irresistible Flavor Profile: The honey‑garlic glaze delivers a caramelized sweetness that perfectly offsets the savory soy base, while a dash of sriracha adds a gentle kick that awakens the palate.
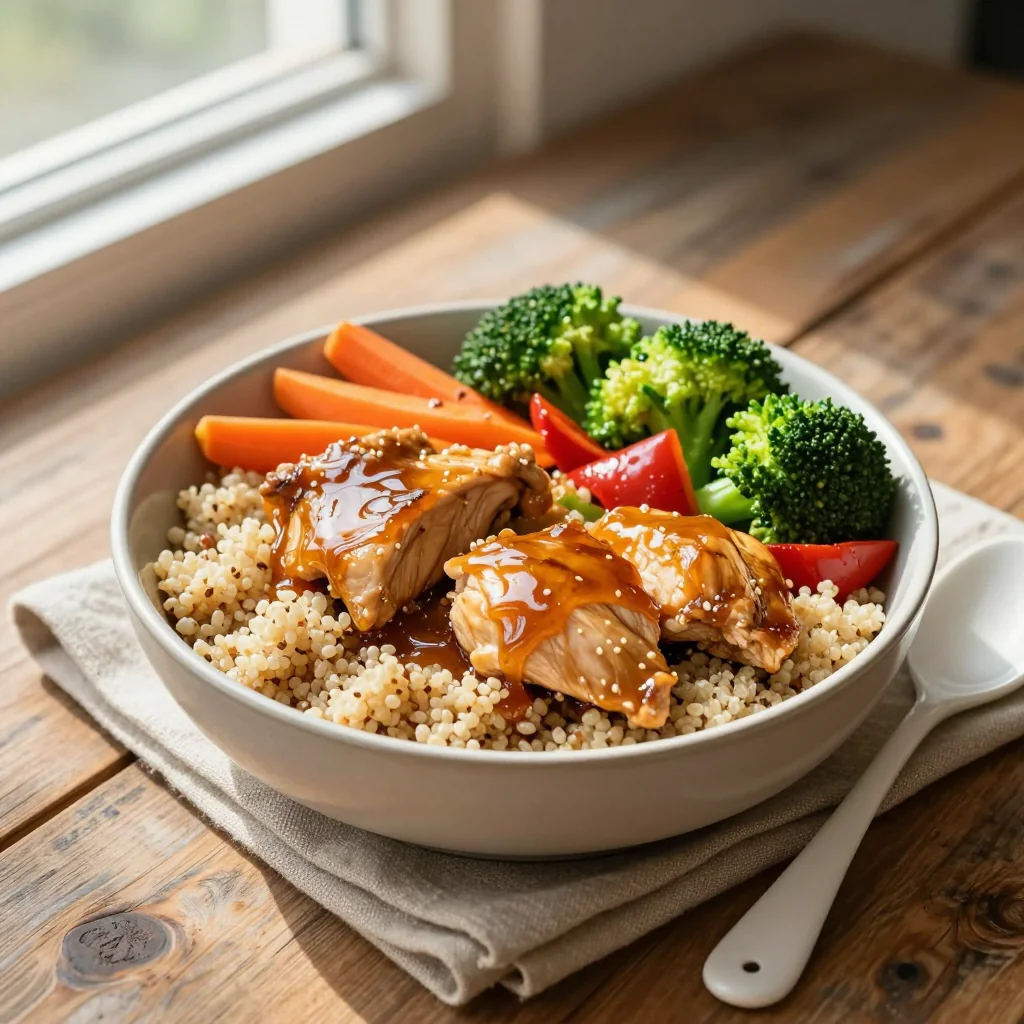
- ✨ Balanced Nutrition: Each bowl offers lean protein, complex carbs from brown rice, and a rainbow of vegetables, ensuring sustained energy and essential micronutrients.
- ✨ Time‑Saving Meal Prep: Cook everything in under an hour, portion into containers, and enjoy a ready‑made lunch or dinner for four days straight.
- ✨ Customizable Base: Swap brown rice for quinoa, cauliflower rice, or even noodles to suit dietary preferences without compromising texture.
- ✨ Kid‑Friendly Appeal: The sweet glaze often wins over younger eaters who might otherwise shy away from Asian-inspired dishes.
- ✨ Minimal Clean‑Up: One pan for the chicken, a pot for rice, and a quick stir‑fry for veggies means fewer dishes and more time to relax.
🥗 Ingredients
📝 Complete Ingredient List
For the Chicken Marinade:
For the Honey Garlic Sauce:
For the Bowls (Base & Veggies):

🔍 Focus on Key Ingredients
Raw Honey
Honey provides natural sweetness and a glossy finish that caramelizes beautifully during cooking. Choose a light, floral honey for subtle flavor, or a robust buckwheat honey if you enjoy deeper, earthier notes. The sugars in honey also help achieve that characteristic “sticky” texture without the need for excessive oil.
Soy Sauce
Low‑sodium soy sauce supplies umami depth while keeping the dish from becoming overly salty. It also contributes a dark amber color that enhances the visual appeal of the glaze. If you prefer gluten‑free, substitute with tamari in equal amounts.
Fresh Garlic
Fresh minced garlic delivers a pungent aroma that mellows into a sweet, buttery flavor once cooked. Crushing the cloves releases allicin, which not only adds taste but also offers health benefits like antioxidant activity.
🔄 Quick Substitutions
| If you don’t have... | Use instead... |
|---|---|
| Brown rice | Quinoa or cauliflower rice |
| Soy sauce | Tamari or coconut aminos |
| Edamame | Peas or green beans |
👨🍳 Step‑by‑Step Instructions
Follow these detailed steps to create perfectly sticky chicken and vibrant bowls that stay fresh all week.
📋 Phase 1: Preparation & Mise en Place
Gather your tools, measure ingredients, and set up a clean workspace.
Prepare the chicken
Pat the chicken breasts dry with paper towels. Slice each breast into bite‑size strips about 1‑inch wide. This shape ensures quick, even cooking and maximizes surface area for the glaze to cling.
Marinate the chicken
In a large bowl, combine 2 tbsp soy sauce, 1 tbsp olive oil, garlic powder, ground ginger, and black pepper. Add the chicken strips, toss to coat, and let sit for 10 minutes while you prep the sauce. The brief marination infuses the meat with savory depth without overpowering the glaze later.
🔥 Phase 2: Cooking & Assembly
Create the glaze, cook the chicken, and assemble the bowls.
Make the honey garlic glaze
In a medium saucepan over medium heat, whisk together ¼ cup honey, 3 tbsp soy sauce, 2 tbsp rice vinegar, sriracha, and minced garlic. Bring to a gentle simmer, stirring constantly. In a small cup, dissolve 1 tsp cornstarch in 2 tbsp water, then slowly pour into the simmering sauce. Continue to whisk until the mixture thickens and becomes glossy, about 2‑3 minutes.
Cook the chicken
Heat a large non‑stick skillet over medium‑high heat. Add a drizzle of oil, then place the marinated chicken strips in a single layer. Cook for 3‑4 minutes per side, or until golden brown and cooked through. Pour the prepared glaze over the chicken, tossing to coat each piece evenly. Let the glaze caramelize for an additional 1‑2 minutes, stirring gently.
Prepare the rice and vegetables
While the chicken finishes, cook brown rice according to package instructions (typically 1 cup rice to 2 cups water, simmer 40 minutes). Steam or blanch the edamame for 3 minutes, then shock in ice water to retain bright green color. Slice cucumber into half‑moons and shred carrots using a grater or food processor.
✨ Phase 3: Finishing & Serving
Final checks, plating, and storage.
Check doneness
Slice a piece of chicken and ensure the interior is no longer pink and reaches an internal temperature of 165 °F (74 °C). The glaze should be thick enough to coat the back of a spoon without sliding off.
Assemble the bowls
Divide the cooked brown rice among four meal‑prep containers. Arrange shredded carrots, cucumber slices, and edamame on top of the rice in separate sections. Place a generous portion of the sticky chicken over the rice, then drizzle any remaining glaze from the pan over the entire bowl. Sprinkle toasted sesame seeds and sliced green onions for crunch and freshness.
Serve or store
Enjoy a bowl immediately while warm, or let it cool to room temperature before sealing the containers for refrigeration. The flavors meld beautifully after a few hours, making it an ideal make‑ahead lunch.
💡 Expert Tips & Tricks
🛒 Choosing the Right Ingredients
Select free‑range or organic chicken breasts for better flavor and less likelihood of off‑notes. When buying honey, look for raw or unfiltered varieties; they retain more aromatic compounds. For soy sauce, a naturally brewed Japanese shoyu offers a smoother umami compared to industrially produced versions.
🔪 Preparation Techniques
Cut the chicken against the grain to keep it tender. Patting the pieces dry before searing ensures a crispier exterior. When mincing garlic, let it rest for a minute before adding to the sauce; this activates more flavor compounds.
🌡️ Mastering the Cooking
Maintain medium‑high heat for the skillet; too low and the chicken will steam rather than sear, too high and the glaze can burn. Use a splatter guard if needed, as the honey can cause occasional bubbling.
🍽️ Presentation & Service
For visual contrast, drizzle a thin line of extra honey across the top just before serving. Add a pop of color with pickled red onions or a few radish slices for an elegant touch.
🏆 Pro Tips
Elevate this dish from home‑cooked comfort to restaurant‑level excellence with these insider secrets.
- 🎯 Control the Caramelization: Add a pinch of baking soda to the glaze just before finishing. The alkaline environment accelerates the Maillard reaction, giving the sauce a deeper amber hue without extra sugar.
- 🎯 Layer Flavors with Aromatics: Toast a few crushed coriander seeds in the skillet before adding the chicken. Their citrusy notes subtly complement the honey.
- 🎯 Texture Balance: Lightly toast the sesame seeds in a dry pan until golden. This adds a nutty crunch that contrasts the tender chicken.
- 🎯 Sauce Consistency: If the glaze becomes too thick after refrigeration, whisk in a splash of warm water or low‑sodium broth to restore its silky flow.
- 🎯 Portion Precision: Use a kitchen scale to weigh each chicken strip before cooking. This ensures uniform cooking times and consistent nutrition per serving.
- 🎯 Finish with Acid: A squeeze of fresh lime juice just before serving brightens the sweet‑savory balance and cuts any residual richness.
"The secret to a great glaze is patience; let it simmer slowly, and the flavors will marry perfectly." — Chef Mei Lin, Michelin‑starred Asian Fusion
🔄 Variations & Adaptations
Feel free to tweak this recipe to match your dietary needs, flavor cravings, or seasonal produce.
🥬 Vegetarian / Vegan Version
Replace the chicken with firm tofu or tempeh. Press tofu to remove excess moisture, then cut into cubes and follow the same marination and glazing steps. For a vegan glaze, swap honey with maple syrup and ensure the soy sauce is gluten‑free.
- Use 400 g extra‑firm tofu, pressed and cubed.
- Replace honey with ¼ cup pure maple syrup.
🌶️ Flavor Variations
Explore different cultural twists by adjusting the glaze and accompaniments.
Spicy Version
Increase sriracha to 2 tbsp and add ½ tsp crushed red pepper flakes for a noticeable heat.
Mediterranean Version
Swap rice vinegar for lemon juice, add 1 tsp dried oregano to the glaze, and serve over couscous with roasted cherry tomatoes.
Asian Fusion Version
Incorporate 1 tbsp hoisin sauce and garnish with fresh cilantro and sliced jalapeños for an extra layer of complexity.
⚠️ Dietary Adaptations
Gluten‑Free
Use tamari instead of soy sauce and ensure the cornstarch is pure (no wheat additives).
Lactose‑Free
This recipe is naturally lactose‑free; just double‑check any pre‑made sauces you might add.
Low‑Calorie
Reduce honey to 3 tbsp, swap brown rice for cauliflower rice, and increase the proportion of non‑starchy vegetables.
👶 Kid‑Friendly Version
Omit sriracha and use a milder soy sauce. Cut carrots and cucumber into fun shapes with a small cutter, and serve the glaze on the side so children can dip as they like.
📦 Storage & Reheating
🧊 Conservation
In the Refrigerator:
- Duration: 4 days
- Container: Airtight glass or BPA‑free plastic containers
- Tip: Store the glaze in a separate small jar to keep the rice from getting soggy.
In the Freezer:
- Duration: 2 months
- Method: Cool the bowls completely, then wrap each container tightly with foil before freezing.
- Defrost: Transfer to the refrigerator overnight or use the microwave’s defrost setting.
💡 For optimal texture, reheat only the chicken and glaze together; keep the rice and veggies separate until serving.
♨️ Reheating
🔥 In the Oven (Recommended):
- Preheat to 175 °C (350 °F).
- Cover the bowl with aluminum foil to retain moisture.
- Heat for 12‑15 minutes.
- Remove foil, stir gently, and heat an additional 3‑5 minutes to re‑crisp the chicken.
⚡ In the Microwave (Quick):
- Cover with a microwave‑safe lid.
- Heat on medium power for 2 minutes.
- Stir, then continue in 30‑second bursts until hot.
🍳 In a Skillet:
Heat a splash of oil over medium heat, add the chicken and glaze, and sauté for 3‑4 minutes, stirring frequently to prevent burning.
🍷 Perfect Pairings
🥗 Side Dishes
- Asian Slaw: A crisp mix of cabbage, carrots, and rice vinegar dressing adds crunch and acidity.
- Miso Soup: Light and savory, it balances the sweetness of the glaze.
- Pickled Daikon: Its tang cuts through the richness, refreshing the palate.
🍷 Wine & Beverage Pairings
- Riesling (off‑dry): The slight sweetness mirrors the honey while its acidity balances the soy.
- Gewürztraminer: Aromatic notes of lychee complement the Asian spices.
- Non‑Alcoholic: Sparkling ginger lemonade adds fizz and a hint of spice.
🍰 Completing the Meal
Start with a light miso‑marinated cucumber appetizer, follow with the sticky chicken bowls, and finish with a delicate green tea ice cream or a slice of mango sorbet for a refreshing finish.
❓ Frequently Asked Questions
Q: Can I use bone‑in chicken thighs instead of breasts?
A: Absolutely! Bone‑in thighs stay juicier and add extra flavor. Increase the cooking time by about 5‑7 minutes and ensure the internal temperature reaches 165 °F (74 °C). Adjust the glaze quantity if you prefer a thicker coating.
Q: How do I prevent the honey from burning?
A: Keep the heat at medium‑high, not high, and stir continuously once the honey is added. Adding a splash of water or broth when the sauce begins to thicken can lower the temperature and protect the sugars.
Q: Is it okay to use brown sugar instead of honey?
A: Yes, brown sugar works, but the flavor profile shifts toward a deeper molasses note. Use the same volume (¼ cup) and consider adding a teaspoon of lemon juice to preserve brightness.
Q: What if I don’t have a kitchen scale?
A: The recipe is designed with easy‑to‑measure cup and spoon values. For best accuracy, use the provided measurements; the portion‑adjuster will still scale correctly based on the numeric data‑base values.
Q: Can I make this recipe ahead of time for a weekend gathering?
A: Definitely. Prepare the bowls a day in advance, store them sealed, and reheat just before serving. The flavors actually deepen after a night in the fridge, making it even more delicious.
Q: How can I make the dish lower in sodium?
A: Choose a low‑sodium soy sauce, reduce the amount by half, and add a splash of low‑sodium chicken broth to maintain volume. You can also rinse the edamame briefly to remove excess salt.
🎉 Let’s Get Cooking!
Sticky Honey Garlic Chicken Meal Prep Bowls bring together the comfort of home cooking with the excitement of bold Asian flavors. The sweet‑savory glaze, paired with wholesome grains and crisp veggies, creates a balanced meal that fuels your day and delights your taste buds. Whether you’re a busy professional, a fitness enthusiast, or a parent looking for kid‑friendly lunches, this recipe fits seamlessly into any lifestyle.
Give it a try, experiment with the variations, and share your results. Your feedback helps the community grow, and your photos might inspire the next home chef!
Have you tried this recipe?
Leave a comment and rating below! Share your photos on Instagram with #StickyHoneyGarlicBowl for a chance to be featured.
Sticky Honey Garlic Chicken Meal Prep Bowls
A sweet‑savory, protein‑rich bowl perfect for week‑long meal prep.
📝 Ingredients
Chicken Marinade
Honey Garlic Sauce
Bowls Base & Veggies
👨🍳 Instructions
- 1 Pat chicken dry, slice, and marinate with soy, oil, garlic powder, ginger, and pepper.
- 2 Whisk honey, soy, vinegar, sriracha, and minced garlic; simmer and add cornstarch slurry.
- 3 Sear marinated chicken in a hot skillet until golden; pour glaze over and coat.
- 4 Cook brown rice; steam edamame; prepare carrots, cucumber, and green onions.
- 5 Divide rice into four containers, layer vegetables, top with glazed chicken.
- 6 Sprinkle sesame seeds and drizzle any remaining glaze.
- 7 Seal containers; refrigerate up to four days or freeze for two months.
- 8 Reheat in oven, microwave, or skillet as preferred.
- 9 Garnish with extra green onions or a squeeze of lime before serving.
- 10 Enjoy your balanced, flavorful meal prep bowls!
🥗 Nutrition (per serving)
*Values are estimates based on standard ingredient measurements.


💬 Comments & Reviews
Leave a Comment
No comments yet. Be the first to share your thoughts!