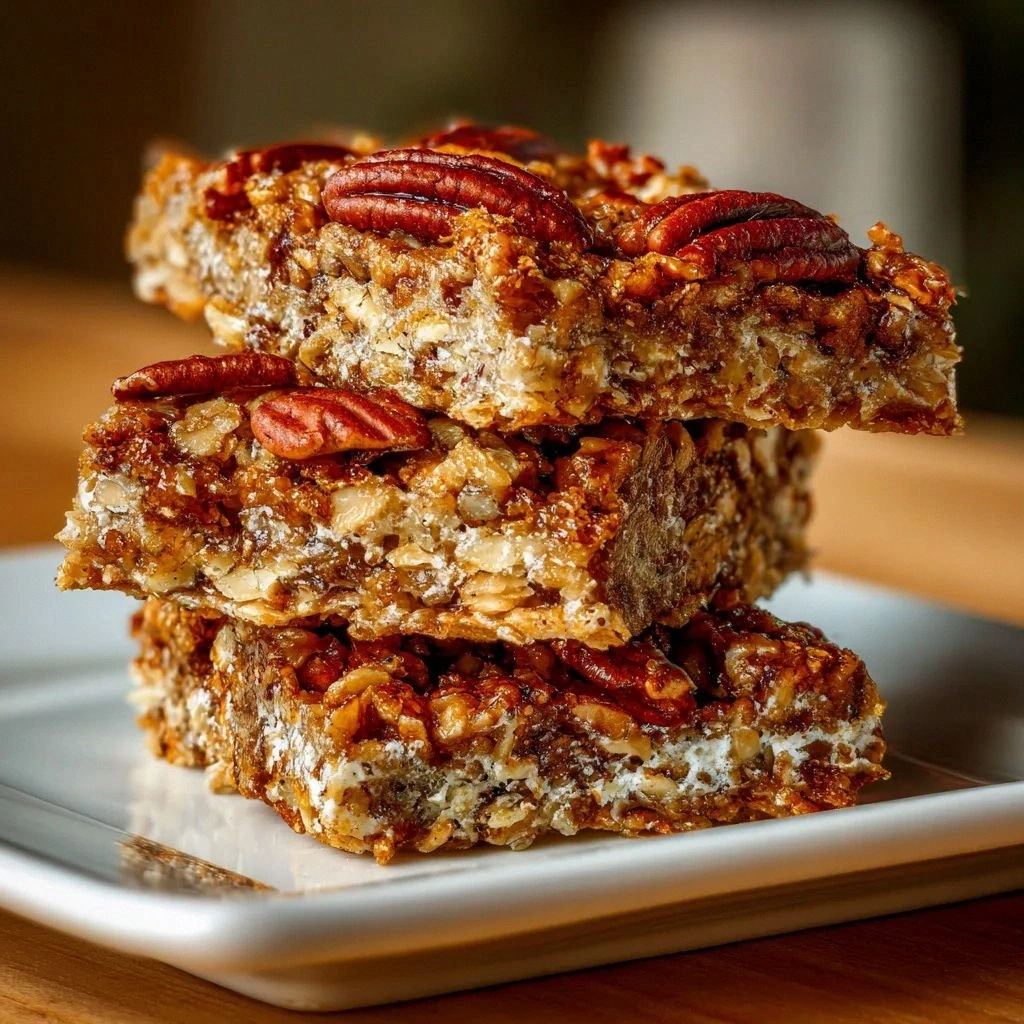
Picture this: I’m standing in my cramped kitchen, a half‑filled pot of oats, a handful of pecans, and a jar of maple syrup that smells like the first snow of winter. I’ve been chasing the perfect sweet‑yet‑salty snack for weeks, but every batch ends up either dry like a desert or soggy like a soggy sandwich. The moment I cracked open the maple jar and felt that thick syrup swirl, I knew I’d found the key to turning ordinary granola bars into a chewy, caramel‑kissed masterpiece.
I opened the oven, preheated it to 350°F, and tossed the oats into a bowl. The pecans, toasted to a golden brown, added a nutty crunch that made my taste buds do a little happy dance. The maple syrup, thick and amber, poured over the almond butter like liquid sunshine. When the mixture hit the dry ingredients, the scent of toasted oats and warm maple filled the kitchen, making my stomach growl louder than a drum solo.
If you’ve ever tried to make granola bars that taste like a failed experiment, this version will make you question all your previous attempts. I dare you to taste one and not go back for seconds. The first bite is a burst of sweet maple, the second a satisfying snap of pecan, and the third? Pure, buttery comfort that makes you want to shout from the rafters. Hands down, this is the best version you’ll ever make at home.
What makes this recipe different? It’s not just the ingredients—though the maple syrup and pecans are a winning combo. It’s the technique: pressing the mixture firmly, baking just until the edges turn golden but the center stays moist, and letting it cool before slicing. The result is bars that hold together like a well‑written novel, not a crumbly disaster. Let me walk you through every single step—by the end, you’ll wonder how you ever made it any other way.
What Makes This Version Stand Out
- Flavor: The maple syrup gives a caramel glow that pairs perfectly with the earthy pecans. Each bite delivers a sweet‑salty harmony that feels like a warm hug.
- Texture: Pressed firmly, the bars hold together like a brick wall, yet they melt in your mouth with a satisfying chew.
- Simplicity: No fancy gadgets, no complicated steps—just a bowl, a pan, and a little patience.
- Uniqueness: The optional cranberries add a tart pop that cuts through the sweetness, turning a simple snack into a flavor adventure.
- Crowd Reaction: Friends who’ve tried other granola bars will drop their forks and say, “I can’t believe this is homemade!”
- Ingredient Quality: Using high‑quality almond butter and real maple syrup elevates the bars from good to unforgettable.
- Cooking Method: Baking at a moderate temperature ensures even browning without burning the sugars.
- Make‑Ahead Potential: These bars keep fresh for a week in an airtight container, making them perfect for on‑the‑go lunches.
Alright, let's break down exactly what goes into this masterpiece...
Inside the Ingredient List
The Flavor Base
Rolled oats are the backbone of these bars, providing a hearty, fibrous texture that keeps the bars chewy. They absorb the maple syrup and almond butter, creating a cohesive batter that holds together when sliced. If you skip oats, you’ll end up with a crumbly, nut‑only snack that falls apart. For an extra crunch, try mixing in a handful of toasted quinoa flakes.
The Texture Crew
Pecans add that signature buttery crunch that makes every bite a delight. Toast them lightly in a dry skillet until they emit a nutty aroma; this brings out their natural oils and deepens the flavor. If you’re allergic to nuts, walnuts or almonds can be swapped in, though the flavor profile will shift slightly. A pinch of sea salt amplifies the sweet maple, balancing the overall taste.
The Unexpected Star
Maple syrup is the star that ties everything together, but it’s more than just sweet—it adds a subtle caramel nuance that lingers on the palate. Use pure, Grade A maple syrup for the best flavor; cheaper syrups often have artificial additives that can alter the taste. If you prefer a lighter sweetness, reduce the syrup by a tablespoon or add a splash of honey.
The Final Flourish
Almond butter brings creaminess and healthy fats, binding the mixture into a smooth, sticky mass that stays together. Its nutty flavor complements the pecans, creating a layered taste experience. Vanilla extract, even a single teaspoon, lifts the entire flavor profile, adding depth and aroma. Dried cranberries, optional, introduce a tart contrast that cuts through the sweetness, turning the bars into a balanced snack.
Everything's prepped? Good. Let's get into the real action...
The Method — Step by Step
- Preheat your oven to 350°F (175°C). Line a 9×13 inch baking pan with parchment paper, leaving a small overhang for easy removal. The parchment keeps the bars from sticking and makes clean‑up a breeze. This step is crucial for even baking.
- In a large mixing bowl, combine 2 cups of rolled oats with 1 cup of chopped pecans. Toss them together until the nuts are evenly distributed. The oats provide the bulk, while the pecans add crunch. This dry mix is the foundation of your bars.
- In a small saucepan over medium heat, gently warm ½ cup of maple syrup and ½ cup of almond butter together. Stir constantly until the mixture becomes glossy and smooth. This creates a sticky, caramel‑like coating. The heat helps the butter melt and the syrup thicken.
- Remove the saucepan from heat and stir in 1 teaspoon of vanilla extract and a pinch of salt. The vanilla lifts the maple’s sweetness, while the salt sharpens the overall taste. Mix until the liquid is a uniform, glossy glaze.
- Pour the wet mixture over the dry oat‑pecan blend. Use a spatula to fold everything together until each oat and nut is coated. The mixture will look slightly sticky, but that’s exactly what you want. This step ensures every bite has that sweet‑buttery coating.
- If you’re using dried cranberries, fold them in now. They’ll add a burst of tartness that balances the maple sweetness. The cranberries also add a pop of color that makes the bars look inviting. This optional step can be skipped if you prefer a classic flavor.
- Transfer the mixture to the prepared pan and press it down firmly with the back of a spoon or a flat spatula. The goal is a compact, even layer. Watch the edges as they start to pull away from the pan; this indicates the bars are firm enough to cut later. This step is the moment of truth.
- Bake for 25–30 minutes, until the edges turn a deep golden brown and the center is set but still slightly moist. The aroma will be intoxicating, a sweet, nutty scent that fills the kitchen. Keep an eye on the timer—overbaking turns the bars dry.
- Remove the pan from the oven and let the bars cool in place for 10 minutes. This resting period allows the structure to set, making slicing easier. Once cooled, lift the bars out using the parchment overhang.
- Cut the bars into 12 equal pieces with a sharp knife. The bars should hold together like a well‑crafted brick. Store them in an airtight container at room temperature or refrigerate for longer freshness. Enjoy them as a breakfast treat or an afternoon pick‑me‑up.
That's it — you did it. But hold on, I've got a few more tricks that'll take this to another level...
Insider Tricks for Flawless Results
The Temperature Rule Nobody Follows
Many bakers bake at a high temperature to get a quick crust, but that often dries out the bars. Baking at 350°F allows the maple and almond butter to meld slowly, creating a tender interior. I once tried 400°F and the bars came out rock‑hard. Stick to the moderate heat and you’ll get that perfect chew.
Why Your Nose Knows Best
As the bars bake, the sweet aroma rises, and your nose starts to tell you when the edges are ready. Don’t rely solely on the timer; trust the scent. The smell of toasted nuts and maple is a clear indicator that the bars are golden and ready to come out. It’s a simple sensory cue that saves you from overbaking.
The 5‑Minute Rest That Changes Everything
Letting the bars rest in the pan for five minutes after baking allows the internal structure to set. During this time, the mixture firms up, making the bars easier to slice. Skipping this step often leads to bars that crumble or stick to the pan. I’ve seen people try to cut them immediately and end up with a mess.
Pressing for Perfection
Pressing the mixture into the pan with a flat spatula ensures an even thickness. A thick layer will bake unevenly, causing some parts to burn while others stay raw. A thin layer will make the bars too dry. Aim for a ½-inch thickness for a balanced bake.
Cooling on a Wire Rack
After removing the bars from the oven, place the pan on a wire rack to cool. This allows air to circulate around the bars, preventing condensation that can soften the edges. If you keep them on a flat surface, they might become soggy on the bottom. I use a rack for every batch.
Creative Twists and Variations
Chocolate Chip Madness
Swap the dried cranberries for dark chocolate chips. The chocolate melts into the maple glaze, creating a decadent, gooey center. This variation is perfect for chocolate lovers who still want a nutty crunch. The bars become an instant crowd‑pleaser at parties.
Spiced Citrus Burst
Add a tablespoon of orange zest and a pinch of cinnamon to the dry mix. The citrus brightens the maple’s sweetness, while the cinnamon adds warmth. The result is a bar that feels like a holiday treat, even in July. It’s a refreshing twist that keeps the flavor profile lively.
Almond Joy Edition
Replace the pecans with toasted almonds and fold in shredded coconut. The coconut gives a tropical vibe, and the almonds provide a mild, buttery taste. This version is reminiscent of the popular candy bar but with a healthier twist. It’s great for those who love coconut and almonds.
Savory Salted Caramel
Increase the maple syrup slightly and add a tablespoon of brown butter. The brown butter deepens the caramel flavor, while a generous pinch of sea salt turns the bars into a savory snack. This version pairs well with cheese or a glass of red wine. It’s a game‑changer for savory snacking.
Vegan Delight
Use sunflower seed butter instead of almond butter and a plant‑based maple syrup. This keeps the bars entirely vegan while preserving the rich flavor. The texture remains chewy, and the nutty crunch is unchanged. It’s a perfect option for plant‑based eaters who crave comfort food.
Storing and Bringing It Back to Life
Fridge Storage
Keep the bars in an airtight container in the refrigerator for up to a week. The cool temperature preserves the maple glaze, keeping the bars moist. For best flavor, let them sit at room temperature for a few minutes before eating. This method is ideal for daily grab‑and‑go breakfasts.
Freezer Friendly
Wrap each bar individually in parchment paper and place them in a freezer bag. Freeze for up to three months. When you’re ready to eat, let them thaw at room temperature for 10 minutes. The texture stays chewy, and the maple flavor remains intact.
Best Reheating Method
To revive a stale bar, warm it in a skillet over low heat for a minute or two. Add a tiny splash of water before heating; the steam rehydrates the bars, restoring their chewiness. Avoid microwaving, as it can make the bars rubbery. A quick pan‑warm keeps them fresh and delicious.