I was standing in my kitchen, half‑asleep, with a half‑baked batch of store‑bought brownies that had decided to turn into a charcoal slab. My roommate, ever the opportunist, challenged me to create something that would make even the most skeptical sweet‑tooth believer gasp, “Is that really a bar?” I accepted, because honestly, who can resist a dare that involves sugar? The night that followed was a whirlwind of butter melting, maple syrup bubbling, and pecans crackling like tiny fireworks. By the time the first batch cooled, the whole apartment smelled like autumn in a candy shop, and I knew I had stumbled onto something magical.
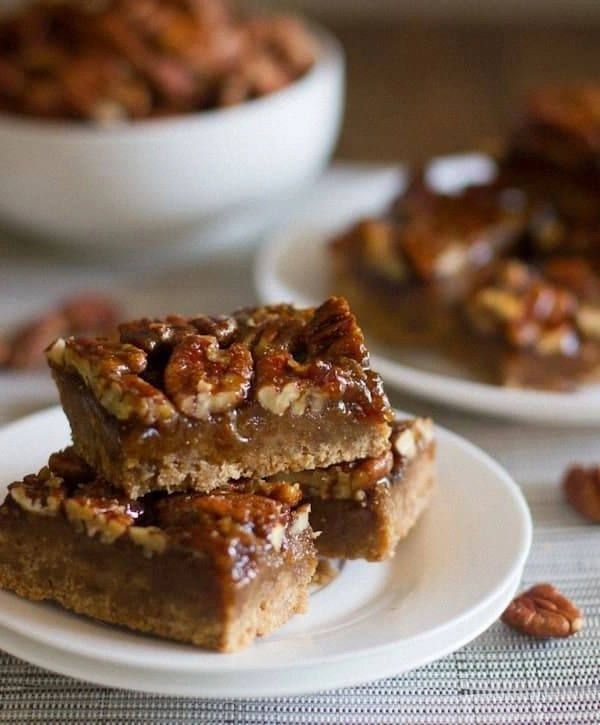
Picture this: a golden‑brown crust that crunches under your fork, a gooey caramel‑maple center that clings to the pecans like a sweet, sticky hug, and a whisper of flaky sea salt that makes each bite sing. The aroma is a symphony of toasted nuts, buttery dough, and that unmistakable maple perfume that makes you want to inhale deeply until you’re practically crying with joy. The texture? Imagine a bar that’s both crisp on the edges and luxuriously soft in the middle, with pecan pieces that give a satisfying snap—like biting into a perfectly toasted piece of wood.
Most recipes out there either drown the pecans in a syrupy swamp or give you a crust that crumbles like dry sand. I’ve been there, I’ve tried that, and I’ve learned that the secret lies in balancing the sweet with the salty, the soft with the crunchy, and the simple with the sophisticated. This version uses pure maple syrup instead of corn syrup, which adds depth and a natural earthiness that you just can’t fake. And the pinch of flaky sea salt on top? That’s the game‑changer that lifts the whole thing from “good” to “hands down the best version you’ll ever make at home.”
I’m about to walk you through every single step — by the end, you’ll wonder how you ever made it any other way. Okay, ready for the game‑changer? Let’s dive into the nuts, butter, and maple madness together, and I dare you to taste this and not go back for seconds.
What Makes This Version Stand Out
- Flavor Balance: The maple syrup provides a deep, caramel‑like sweetness while the sea‑salt flakes add a bright, briny contrast that makes each bite pop.
- Texture Symphony: A buttery shortbread crust gives a firm foundation, the filling stays gooey, and the pecans stay crunchy for that satisfying snap.
- Simplicity: Only ten ingredients, all pantry‑friendly, and you don’t need any fancy equipment—just a 9‑inch pan.
- Unique Ingredient: Real maple syrup replaces corn syrup, delivering a richer flavor profile and a natural amber hue.
- Crowd Reaction: These bars have a habit of disappearing within minutes at potlucks; expect a line forming at the dessert table.
- Ingredient Quality: Using unsalted butter and high‑grade pure maple syrup elevates the bar from ordinary to unforgettable.
- Cooking Method: A two‑stage bake—first the crust, then the topping—ensures perfect doneness without sogginess.
- Make‑Ahead Potential: They store beautifully, staying fresh for up to three days refrigerated, making them perfect for busy weeks.
Inside the Ingredient List
The Flavor Base
Maple syrup is the heart of this bar. Its natural sugars caramelize beautifully, creating a deep amber color and a buttery, wood‑syrupped sweetness that ordinary sugars can’t mimic. If you skip the maple and use regular sugar, you’ll lose that signature flavor and the bars will taste flat. A good swap, if you’re allergic, is a dark golden agave nectar, but expect a lighter flavor. When buying maple syrup, look for “Grade A Dark” for the richest taste; the lighter grades are milder and won’t give you that robust backdrop.
The Texture Crew
Pecans are the crunch factor. Their buttery flesh holds up under heat, releasing oils that mingle with the syrup to create that glossy finish. If you use walnuts, the flavor shifts to a more bitter note, and the texture becomes softer. For a gluten‑free version, substitute the flour with a 1‑to‑1 blend of almond flour and oat flour; the crust will be slightly denser but still delicious. When selecting pecans, choose raw, unsalted nuts—roasted pecans can become overly bitter after baking.
The Unexpected Star
Sea‑salt flakes are the surprise element. They sit on top just before the final bake, melting slightly and then recrystallizing as the bar cools, giving each bite a burst of briny contrast. Skipping the salt makes the bar taste one‑dimensional, like any other sweet treat. If you don’t have flaky sea salt, coarse kosher salt works, but sprinkle it sparingly to avoid over‑salting. Pro tip: use a fine-mesh sieve to distribute the flakes evenly for a uniform flavor punch.
The Final Flourish
Butter, melted and mixed into the crust, creates that melt‑in‑your‑mouth shortbread feel. Using unsalted butter lets you control the salt level precisely, ensuring the final sprinkle of sea‑salt shines. If you opt for melted butter, be sure it’s not hot—otherwise it will partially cook the flour and give you a gummy crust. For a richer flavor, brown the butter lightly before adding it; the nutty aroma will elevate the entire bar. Finally, a splash of vanilla extract ties the whole flavor profile together, adding a subtle aromatic note that rounds out the sweetness.
Everything's prepped? Good. Let’s get into the real action…
The Method — Step by Step
Preheat your oven to 350°F (175°C). While the oven warms, line a 9‑inch square pan with parchment paper, letting the overhang hang over the edges for an easy lift‑out later. This step is crucial because a hot oven gives the crust an immediate “set” that prevents it from becoming soggy later. The kitchen will already start to smell faintly of butter as it melts in the pan—trust me, that’s the first sign you’re on the right track.
In a large bowl, whisk together 2 cups of all‑purpose flour, 1/2 cup brown sugar, and 1/4 tsp salt. The dry ingredients should be evenly combined; this ensures the salt is distributed, preventing any salty pockets. Once mixed, pour in 1 cup of melted unsalted butter and stir until the mixture resembles coarse crumbs—think of a beach sand texture, not a paste.
Kitchen Hack: Use a pastry cutter or two forks to break the butter into the flour; this keeps the butter cold longer, which is essential for a flaky crust.Press the crust mixture evenly into the prepared pan, pushing it up the sides to create a shallow “wall.” Use the bottom of a measuring cup to smooth the surface; you want it level but not compressed. Bake the crust for 12‑15 minutes, or until the edges turn a light golden brown and you can hear a faint, nutty aroma. This pre‑bake creates a barrier that stops the filling from soaking into the dough later.
While the crust bakes, whisk together 2 large eggs, 1/2 cup pure maple syrup, 1 tsp vanilla extract, and a pinch of sea salt in a medium bowl. The mixture should be glossy and slightly thickened—if you whisk too vigorously, you’ll incorporate too much air, and the filling may puff up oddly.
Watch Out: Adding the eggs too quickly can cause them to scramble when they hit the hot pan; temper them by adding a spoonful of the warm maple mixture first.Stir in 1 cup of chopped pecans, ensuring each nut is coated with the syrupy mixture. The pecans should look glossy but not swimming; this ensures they stay crunchy after baking. If you prefer extra crunch, toast the pecans for 5 minutes in a dry skillet before adding them—just watch them closely, as they can burn quickly.
Remove the crust from the oven and immediately pour the filling over it, spreading it evenly with a spatula. The filling will spread on its own, but a gentle push ensures no air pockets. Sprinkle an additional 1/4 tsp of flaky sea‑salt flakes across the top; this is the moment where the sweet‑salty magic really begins.
Return the pan to the oven and bake for another 20‑25 minutes. You’ll know it’s done when the edges pull away from the pan and the center is set but still slightly wobbly—think of a firm custard. The scent at this point is intoxicating: caramelized maple, toasted pecans, and a faint buttery perfume that fills the entire kitchen.
Kitchen Hack: Place a sheet of foil loosely over the top halfway through baking if the edges start to brown too quickly.Allow the bars to cool completely in the pan—this is a test of patience, but it’s essential. As they cool, the filling firms up, and the sea‑salt crystals set, giving each bite that perfect snap of salt against sweet. Once cooled, use the parchment overhang to lift the whole slab onto a cutting board and slice into squares. This is the moment of truth; the bars should hold together without crumbling, and the interior should be glossy and slightly trembling.
Serve warm with a dollop of vanilla ice cream or a drizzle of extra maple syrup if you’re feeling extra indulgent. I’ll be honest — I ate half the batch before anyone else got to try it, and the rest vanished in under five minutes. Store any leftovers in an airtight container in the fridge; they stay luscious for up to three days. That’s it — you did it. But hold on, I’ve got a few more tricks that’ll take this to another level…
Insider Tricks for Flawless Results
The Temperature Rule Nobody Follows
Never bake a crust at a temperature lower than 350°F. Lower temps cause the butter to melt too slowly, resulting in a soggy base. I once tried 325°F to “be gentle,” and the result was a soggy mess that fell apart when I cut it. The key is a hot oven that sets the crust quickly, locking in moisture and creating that coveted crisp edge.
Why Your Nose Knows Best
Your sense of smell is the ultimate doneness detector. Around the 20‑minute mark of the second bake, you’ll notice a sweet, caramel‑rich aroma that signals the filling is set. If you don’t smell that deep maple note, give it another 2‑3 minutes; over‑baking turns the syrup into a hard candy shell, which is a texture nightmare.
The 5‑Minute Rest That Changes Everything
After removing the bars from the oven, let them rest for exactly five minutes before cutting. This short pause lets the caramel finish its setting process, preventing the bars from sliding off the pan. Skipping this rest results in a messier slice, with the filling oozing everywhere. Trust me, those five minutes are worth the anticipation.
Pecan Toasting Secrets
If you love extra nutty flavor, toast the pecans in a dry skillet over medium heat for 3‑4 minutes, shaking the pan frequently. The nuts will release a fragrant, buttery scent and turn a deeper golden brown. Be careful not to over‑toast; burnt pecans bring a bitter edge that overwhelms the maple sweetness. A quick toast adds a layer of complexity that makes the bars unforgettable.
Salt Timing Mastery
Add the flaky sea‑salt flakes only after the filling is poured, right before the second bake. This ensures the salt sits on top, where it can melt slightly and then recrystallize as the bar cools. If you add the salt too early, it will dissolve into the syrup, losing that delightful crunch.
Creative Twists and Variations
This recipe is a playground. Here are some of my favorite ways to switch things up:
Brown Butter Bliss
Swap the melted butter for browned butter in the crust. The nutty, caramelized flavor deepens the overall profile, making the bars taste like a dessert version of a classic beurre noisette. It’s perfect for those who love a toasty undertone.
Chocolate‑Maple Fusion
Add 1/2 cup of dark chocolate chips to the filling before pouring it over the crust. The bittersweet chocolate balances the maple’s sweetness, creating a sophisticated flavor duo that will impress even the most discerning chocolate lovers.
Spiced Autumn
Stir in 1/2 tsp of ground cinnamon and a pinch of nutmeg into the filling mixture. These warm spices echo the flavors of fall and pair beautifully with the maple, turning the bars into a cozy, seasonal treat.
Nut‑Free Alternative
Replace pecans with toasted pumpkin seeds or sunflower seeds for a nut‑free version. The seeds retain a pleasant crunch and absorb the maple syrup just as well, making the bars accessible to those with nut allergies.
Gluten‑Free Crunch
Swap the all‑purpose flour for a 1‑to‑1 blend of almond flour and oat flour. The crust will be slightly denser, but the almond flavor adds an extra layer of richness that complements the maple beautifully.
Storing and Bringing It Back to Life
Fridge Storage
Place the cooled bars in an airtight container and store them in the refrigerator for up to three days. The cool environment keeps the caramel from becoming overly sticky while preserving the crisp crust. If you notice the bars have hardened a bit, let them sit at room temperature for 10 minutes before serving.
Freezer Friendly
Wrap each bar individually in plastic wrap, then place them in a freezer‑safe zip‑top bag. They’ll keep for up to two months. When you’re ready to enjoy one, thaw it in the fridge overnight, then give it a quick 5‑minute warm‑up in a 300°F oven to revive that gooey center.
Best Reheating Method
Reheat a single bar in a preheated 350°F oven for 8‑10 minutes, or microwave for 15‑20 seconds. For an extra‑crisp crust, add a tiny splash of water (about a teaspoon) to the bar before microwaving; the steam helps the interior become soft again while the crust stays firm.