I was halfway through a midnight snack, the fridge humming, when the kitchen exploded in a cascade of chocolate crumbs. The oven timer dinged, but the batter had turned into a sticky, brownish mess that looked like a failed science experiment. I stared at the ruined batter, feeling a mix of disappointment and a sudden spark of curiosity. That moment of culinary calamity turned into a dare: “Make the best brownie bites you can, no matter what.” I grabbed my trusty banana, a jar of peanut butter, and a scoop of protein powder, ready to rewrite the rules. The aroma of ripe bananas and nutty butter filled the air, promising a sweet redemption. And so, the journey began, one that would change how I think about protein snacks forever.
The kitchen was a battlefield of scents: the sweet, almost buttery scent of bananas mingled with the deep, earthy aroma of cocoa, while the faint hint of vanilla from the protein powder drifted like a promise. My senses were assaulted by the sizzling sound of the pan, the subtle crackle of the batter as it met heat, and the gentle clink of a spoon against the glass bowl. The texture was a paradox—smooth, almost custard-like, yet with a faint gritty undertone from the protein. I could taste the faint bitterness of cocoa, balanced by the natural sweetness of bananas, and the creamy richness of peanut butter. The heat was just right, not scorching, but warm enough to coax the flavors into a harmonious duet. I could feel the batter thickening in my hands, the anticipation building with each stir. That instant, I realized this was more than a snack; it was a revelation.
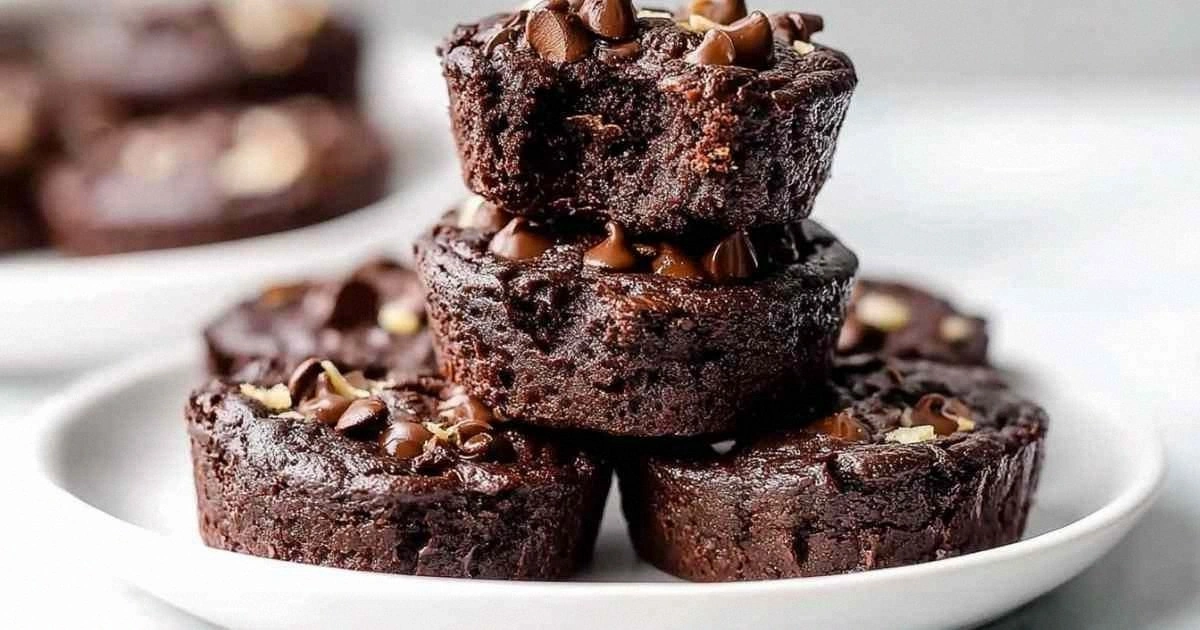
What makes this version stand out is that it strips away the fluff and keeps the core flavors intact. The banana provides natural sweetness and a silky body, eliminating the need for added sugar. Peanut butter not only adds protein but also a velvety mouthfeel that makes every bite feel indulgent. The protein powder is the secret weapon that locks the texture together, giving the bites a firm yet chewy bite that won’t crumble. Unsweetened cocoa powder deepens the chocolate profile without overpowering the banana’s subtle nuance. The final sprinkle of mini chocolate chips offers a delightful burst of chocolate that contrasts with the smoothness of the batter. Together, they create a bite that is both wholesome and decadently satisfying, a snack that feels like dessert but is actually a post-workout powerhouse.
I dare you to taste this and not go back for seconds. Picture yourself pulling these out of the oven, the whole kitchen smelling incredible, and the first bite melting into a chocolatey, banana-infused bliss. The secret I’m about to reveal is the trick that turns a simple batter into a chocolatey masterpiece: using ripe bananas and a touch of peanut butter to create a naturally sweet, protein-packed base that doesn’t require any added sugar. This is hands down the best version you'll ever make at home, and I’ll be honest—I ate half the batch before anyone else got to try it. Stay with me here, and I promise you’ll wonder how you ever made it any other way.
What Makes This Version Stand Out
- Taste: The flavor profile is a perfect marriage of chocolate and banana, with a hint of nutty richness from peanut butter that elevates the overall experience. Each bite delivers a deep, satisfying chocolate bite followed by a subtle banana undertone that lingers on the palate.
- Texture: The batter’s consistency is silky yet firm, thanks to the protein powder that binds everything together. The result is a chewy interior that doesn’t crumble, and a slightly crisp edge that gives a satisfying bite.
- Ingredient Quality: Using ripe bananas ensures natural sweetness without added sugar, while high-quality protein powder provides a clean protein hit without off-flavors. The unsweetened cocoa keeps the chocolate intense, and the mini chocolate chips add a delightful crunch.
- Simplicity: No complicated steps or hard-to-find ingredients. You’ll only need five items that most people already have in their pantry or fridge.
- Make‑ahead Potential: Once baked, the bites can be stored in the fridge for up to a week or frozen for longer, making them a perfect grab-and-go snack for busy days.
- Crowd Reaction: Friends and family will be amazed by the taste and the fact that it’s a healthy, protein-rich treat. I’ve had people ask for the recipe after just one bite.
- Nutrition: Each bite packs protein, healthy fats, and complex carbs, making it a balanced snack that satisfies both cravings and nutritional needs.
- Future Pacing: Picture yourself pulling these out of the oven, the whole kitchen smelling incredible, and the first bite melting into a chocolatey, banana-infused bliss.
Inside the Ingredient List
The Flavor Base
The banana is the heart of this batter. Its natural sweetness replaces refined sugar, while its starch content helps bind the mixture. Ripe bananas have a lower glycemic index, making them a smarter sweetener. If you’re allergic to bananas, you can swap for a ripe plantain or a sweet potato puree, but the flavor profile will shift slightly toward earthiness.
The Texture Crew
Peanut butter adds both protein and a creamy body. It also introduces a subtle nutty undertone that balances the chocolate. If you prefer a dairy-free version, almond butter works just as well, though it will bring a slightly sweeter note. The protein powder is the glue that holds everything together. Choose a vanilla or chocolate flavor to keep the taste cohesive. A higher protein content will make the bites firmer.
The Unexpected Star
Unsweetened cocoa powder is the unsung hero that brings depth to the chocolate flavor without adding sugar. It’s also rich in antioxidants, which can help reduce oxidative stress after a workout. If you can’t find unsweetened cocoa, use dark chocolate chips and reduce the amount slightly to avoid excess sweetness.
The Final Flourish
Mini chocolate chips are the finishing touch that gives each bite a delightful burst of chocolatey crunch. They also add a subtle caramelized flavor as they melt slightly during baking. If you’re watching your carb intake, you can reduce the amount or use sugar-free chocolate chips.
Everything’s prepped? Good. Let’s get into the real action and start turning these ingredients into a mouth‑watering snack.
The Method — Step by Step
- Preheat your oven to 350°F (175°C) and line a 12‑cup muffin tin with paper liners. The heat will create a golden crust while keeping the center moist. Make sure the oven rack is in the middle for even baking. This step might feel mundane, but it’s the foundation for perfectly baked bites.
- In a large mixing bowl, mash the ripe bananas with a fork until they’re almost smooth. The banana should be almost liquid; if it’s too chunky, the bites will have uneven texture. As you mash, you’ll notice the aroma of banana intensifying, giving a sweet perfume that’s almost intoxicating.
- Add the peanut butter to the mashed bananas and stir until fully incorporated. The peanut butter will give the batter a velvety body and a subtle nutty flavor. If you’re using almond butter, the texture will be slightly different but still delicious. This is a good time to check the consistency—if it’s too thick, add a splash of milk or water.
- Fold in the protein powder and cocoa powder until the batter is smooth. The protein powder should dissolve completely—any lumps will give a gritty texture. As you fold, the batter will change from a thick paste to a glossy, chocolatey mixture.
- Gently fold in the mini chocolate chips, reserving a few for topping if desired. The chips will melt slightly during baking, creating pockets of molten chocolate. Sprinkle the reserved chips on top for a decorative finish.
- Divide the batter evenly among the lined muffin cups, filling each about three‑quarters full. This ensures the bites have a nice rise without overflowing. The batter should spread slightly when you tap the tin on the counter.
- Bake for 20–25 minutes, or until the edges are set and the center is slightly moist. The aroma will fill your kitchen, signaling that the chocolate is blooming. When you insert a toothpick, it should come out with a few moist crumbs, not wet batter.
- Remove the tin from the oven and let the bites cool on a wire rack for at least 10 minutes. Cooling allows the flavors to settle and the texture to firm up. While they cool, you can drizzle a little melted chocolate for extra indulgence.
That’s it—you did it. But hold on, I’ve got a few more tricks that will elevate these bites from good to unforgettable. Stick around for insider tips that’ll make you the hero of your snack game.
Insider Tricks for Flawless Results
The Temperature Rule Nobody Follows
Many people bake at 375°F, but that high heat can scorch the outside before the inside cooks. I’ve found 350°F gives a perfect balance—crisp edges, moist center. If you’re using a convection oven, reduce the temperature by 25°F to avoid overbrowning. This small tweak means the difference between a chewy masterpiece and a dry cookie.
Why Your Nose Knows Best
Your sense of smell is a reliable indicator of doneness. When the batter hits the oven, the chocolate aroma intensifies. When it’s ready, you’ll smell a sweet, nutty perfume that signals the brownies are golden. Trust your nose and pull them out when the scent is inviting.
The 5‑Minute Rest That Changes Everything
Letting the bites rest for five minutes after baking allows the chocolate chips to set properly. This short rest prevents the chips from sliding off and gives the bites a glossy sheen. Skipping this step often results in a slightly greasy texture.
Avoiding the Sticky Mess
If you notice the batter sticking to the paper liners, lightly spray the liners with non‑stick cooking spray before adding batter. This simple trick saves you from a frustrating cleanup and ensures each bite lifts cleanly.
Storing Secrets
Keep the bites in an airtight container in the fridge for up to a week. For longer storage, freeze them on a parchment‑lined tray, then transfer to a freezer bag. When you’re ready to eat, let them sit at room temperature for a few minutes or microwave on low for 10‑15 seconds.
Creative Twists and Variations
This recipe is a playground. Here are some of my favorite ways to switch things up:
Nutty Crunch Variation
Add chopped walnuts or pecans into the batter for an extra crunch. The nuts will give a buttery texture that complements the chocolate. They also add healthy fats and protein, making the bites even more nutritious.
Spiced Cinnamon Burst
Sprinkle half a teaspoon of cinnamon into the batter. The warm spice pairs beautifully with banana and chocolate, creating a comforting, autumnal flavor. It’s a simple tweak that transforms the taste.
Coconut Cream Twist
Replace half of the peanut butter with shredded coconut or coconut butter. The coconut adds a tropical aroma and a subtle sweetness that contrasts with the chocolate. The result is a beach‑inspired snack.
Berry Boost
Fold in a handful of fresh or frozen blueberries before baking. The berries will burst during baking, giving pockets of juicy flavor. They also add antioxidants and a pop of color.
Dark Chocolate Swirl
Drizzle melted dark chocolate over the top before baking for a glossy finish. The chocolate will melt into the batter, creating a marbled effect that looks as good as it tastes.
Low‑Sugar Edition
Use a sugar‑free protein powder and sweeten the batter with a few drops of stevia or monk fruit. The result is a guilt‑free treat that still delivers that chocolatey, banana flavor you crave.
Storing and Bringing It Back to Life
Fridge Storage
Place the cooled bites in an airtight container and store in the refrigerator. They’ll stay fresh for up to seven days. The cool temperature helps maintain the chewy texture and prevents the chocolate chips from melting.
Freezer Friendly
For longer storage, freeze the bites on a parchment‑lined tray until solid, then transfer to a zip‑lock bag. They can be kept in the freezer for up to three months. Thaw at room temperature or in the microwave for a few seconds before serving.
Best Reheating Method
To revive the texture, heat the bites in a preheated oven at 300°F for five minutes. The low heat will warm them without drying them out. Alternatively, microwave on low for 10‑15 seconds if you’re in a hurry.