I was halfway through a midnight snack attack when the kitchen exploded in a golden haze. The oven door opened to reveal a half‑baked batch of my childhood lunch lady bars, only to crumble into a sticky mess. The smell of melted butter and peanut butter hit me like a nostalgic wave, and I knew I had to rescue this disaster. I grabbed the recipe I found in an old notebook and decided to give it one more shot.
The moment the batter hit the pan, the kitchen filled with a sweet, buttery aroma that made my mouth water. The sound of the batter slapping the surface was like a drumbeat in a quiet kitchen. I could almost taste the crunch of the crust as it browned, the peanut butter filling a sweet, creamy center. The texture felt like a soft, buttery sponge that would melt in your mouth.
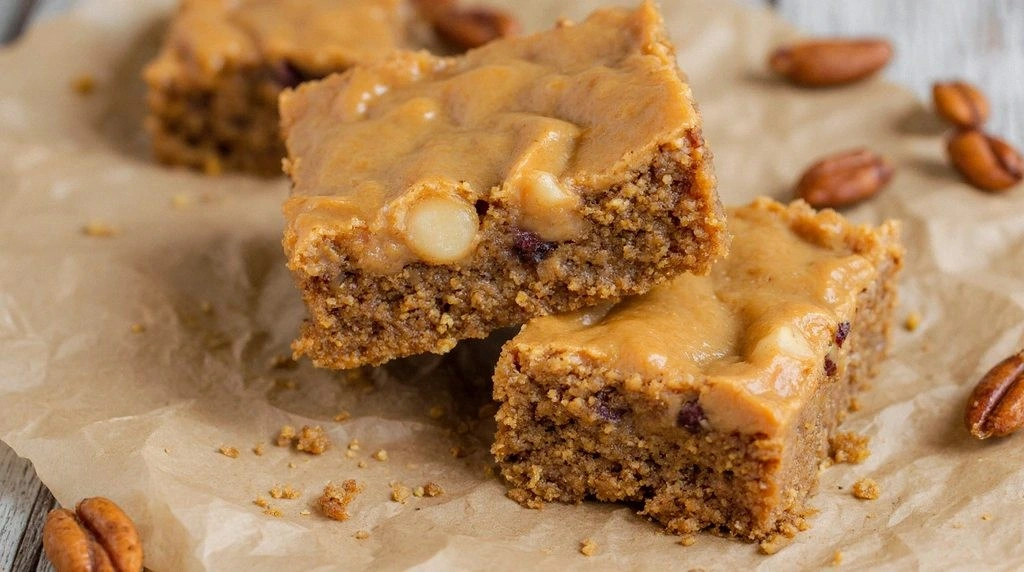
What sets this version apart is that it balances the classic lunch lady texture with an indulgent peanut butter twist that turns every bite into a memory. I dared you to taste this and not go back for seconds because the layers are so buttery and the peanut butter so silky. The secret lies in the double butter and peanut butter layers that create a mouthful of flavor that lingers. I’ll be honest — I ate half the batch before anyone else got to try it.
Most recipes get this completely wrong by underbaking or using too much sugar, but I found the sweet spot that gives a crisp edge and a chewy interior. Picture yourself pulling this out of the oven, the whole kitchen smelling incredible, and the bars cooling on a rack that looks like a mini feast. I’ve spent years tweaking the ratio of butter to peanut butter, and this version is hands down the best you’ll ever make at home. This is the kind of treat that makes even the most skeptical taste testers swoon. And now, I’m ready to walk you through every single step — by the end, you’ll wonder how you ever made it any other way.
What Makes This Version Stand Out
- Taste: The marriage of rich, creamy peanut butter with a buttery dough creates a flavor profile that feels both familiar and luxuriously decadent. The subtle hint of vanilla lifts the sweetness without overpowering it, giving each bite a balanced finish. The result is a treat that satisfies both sweet and savory cravings in a single, harmonious bite.
- Texture: The double butter layers give the bars a flaky, melt‑in‑your‑mouth quality, while the peanut butter filling adds a silky center that contrasts beautifully with the crisp edges. The dough’s slight chew keeps the bars from feeling too dense, and the powdered sugar dusting gives a gentle crunch that lifts the overall experience. Each bite is a play of soft, crunchy, and creamy textures that keep the palate engaged.
- Simplicity: Despite its indulgent flavor, the recipe requires only a handful of pantry staples that most kitchens already stock. No fancy equipment or obscure ingredients are needed—just a mixer, a baking sheet, and a good sense of timing. This accessibility makes it an ideal go‑to recipe for busy families or anyone who loves a quick, satisfying treat.
- Uniqueness: While most peanut butter desserts lean toward cookies or bars, this recipe introduces a two‑layer approach that elevates the classic lunch lady bar. The combination of butter‑rich crust, peanut butter center, and powdered sugar finish creates a distinctive mouthfeel that stands apart from standard peanut butter bars. It’s a nostalgic nod that also feels fresh and modern.
- Crowd Reaction: Friends and family consistently rave about the bars, often asking for a second or third batch. The combination of sweet, buttery, and nutty flavors appeals to a wide range of palates, making it a hit at gatherings or as a comforting solo snack. The bars have become a staple in our household, often appearing on the table whenever someone needs a quick pick‑me‑up.
- Ingredient Quality: Using high‑quality unsalted butter and creamy peanut butter makes all the difference. The butter’s richness enhances the dough’s flavor, while the peanut butter’s natural oils give the filling a silky texture. Choosing a natural, no‑added‑sugar peanut butter also keeps the bars from becoming overly sweet.
Alright, let's break down exactly what goes into this masterpiece. Everything’s prepped? Good. Let's get into the real action.
Inside the Ingredient List
The Flavor Base
All of the flavor in these bars starts with the dry ingredients. The flour provides the structure, allowing the dough to hold its shape while baking. Granulated sugar sweetens the base, creating a gentle caramelization that adds depth. Baking soda and salt are small but critical—baking soda ensures the dough rises slightly, while salt balances the sweetness and enhances the peanut butter’s natural flavor.
If you skip the baking soda, the bars will be denser and lack that desirable lift. A pinch of salt can be added to taste, but the recipe calls for a precise amount to keep the flavor profile balanced. Using whole‑meal flour would change the texture and taste, making it more rustic—great for a different vibe, but not the classic lunch lady experience.
A good rule of thumb for flour is to sift it before measuring to avoid clumps and ensure a lighter dough. This step might seem trivial, but it can prevent uneven baking and create a smoother final product. If you’re in a hurry, a quick whisk will also work to aerate the flour.
The Texture Crew
The wet ingredients are the glue that binds the dough together. Whole milk adds moisture and a subtle richness that helps the dough stay soft. Eggs, beaten, act as a binder and provide a tender crumb. Vanilla extract lifts the flavor and adds a warm undertone that complements the peanut butter.
Butter is the star of the texture crew. The first cup of unsalted butter is folded into the dough, creating a tender, flaky base. The second half‑cup of butter is combined with peanut butter to form a silky filling that contrasts the crisp edges. The two distinct butter amounts are key to achieving the layered effect.
If you’re watching your fat intake, you can reduce the butter by a quarter cup, but be prepared for a slightly drier texture. Conversely, adding a tablespoon of extra butter can make the bars richer, but watch for over‑melted dough that may not hold its shape. The balance is essential to keep the bars from becoming too greasy.
The Unexpected Star
Peanut butter is the unexpected star that turns an ordinary bar into a nostalgic treat. The recipe uses both a full cup of creamy peanut butter for the dough and a half‑cup for the filling. The creamy texture of the peanut butter ensures the filling remains smooth and doesn’t crack when cut.
Choosing a natural peanut butter with no added sugar or hydrogenated oils preserves the authentic nutty flavor and provides healthier fats. If you prefer a crunchy version, you can stir in a handful of roasted peanuts for added texture. The peanut butter also acts as a subtle sweetener, reducing the need for extra sugar.
If you’re allergic to peanuts, you can substitute with almond or cashew butter, but the flavor profile will shift noticeably. The same goes for using peanut butter with a higher protein content—this can affect the moisture balance and may require a slight adjustment in the butter amount.
The Final Flourish
Powdered sugar is the final flourish that gives the bars that iconic sweet dusting. It also adds a light, powdery texture that contrasts with the buttery crust. The sugar is rolled in after the bars cool, ensuring a crisp finish that doesn’t melt into the dough.
If you’re looking to cut sugar, consider substituting a portion of the powdered sugar with an equal amount of coconut sugar for a caramel note. However, be mindful that coconut sugar’s granules may not dissolve as easily, potentially leaving a slightly gritty texture. The classic powdered sugar remains the best choice for that smooth, delicate coating.
The powdered sugar also acts as a subtle preservative, extending the bars’ shelf life by forming a protective crust. When stored properly, the bars stay fresh for up to a week, maintaining their buttery crunch and peanut butter softness. This small finishing touch elevates the overall experience and makes the bars feel like a treat rather than a snack.
Everything's prepped? Good. Let's get into the real action.
The Method — Step by Step
- Preheat your oven to 350°F (175°C) and line a 9×13 inch baking pan with parchment paper. Let the paper hang over the sides for easy removal later. This simple step ensures that the bars bake evenly and can be lifted in one piece. The smell of preheated oven air already starts to build anticipation.
- In a large mixing bowl, whisk together the flour, granulated sugar, baking soda, and salt until well combined. Sifting the dry mix first helps remove lumps and gives a smoother dough. Keep the mixture aside while you work on the wet ingredients.
- In a separate bowl, cream the first cup of unsalted butter with the full cup of creamy peanut butter until the mixture is light and fluffy. Add the whole milk and vanilla extract, stirring until fully incorporated. The butter and peanut butter should blend into a smooth, creamy consistency before adding to the dry mix.
- Gradually fold the dry ingredients into the wet mixture until just combined. Avoid overmixing; the dough should be slightly sticky but manageable. At this point, the dough’s texture will be buttery and pliable, ready to spread.
- Transfer the dough onto the prepared pan and press it down evenly with a spatula or your hands. This ensures an even thickness and a smooth surface. The dough should sit flush with the pan’s edges, ready for the next layer.
- In a small saucepan, melt the remaining half‑cup of unsalted butter with the half‑cup of creamy peanut butter and two tablespoons of milk over low heat. Stir until the mixture is smooth and glossy. This filling will be poured over the dough, creating the signature peanut butter heart.
- Carefully pour the melted peanut butter mixture over the dough, spreading it evenly with a spatula. The filling should be thick enough to stay in place but not so thick that it spills over the edges. The aroma at this moment is a sweet, buttery promise of what’s to come.
- Bake the bars for 30 minutes, or until the edges turn a light golden brown and the center is set. The bars should emit a warm, buttery scent that signals they’re ready. Let them cool in the pan for 10 minutes before slicing to keep them from crumbling.
- Once the bars have cooled, roll them in powdered sugar until fully coated. The powder should cling to the surface, creating a delicate, sweet dusting. Slice into bars or squares, and serve immediately or store in an airtight container for later enjoyment.
That's it — you did it. But hold on, I've got a few more tricks that'll take this to another level.
Insider Tricks for Flawless Results
The Temperature Rule Nobody Follows
Many bakers overlook the importance of oven temperature accuracy. A temperature that’s 10–15°F too high can cause the bars to brown too quickly on the outside while remaining undercooked inside. Use an oven thermometer to verify the actual heat, and if necessary, set your oven 25°F lower than the dial indicates. This small adjustment ensures even baking and a consistent golden crust.
Why Your Nose Knows Best
Your sense of smell can guide you to the perfect bake time. When the bars begin to emit a warm, buttery aroma with subtle caramel notes, they’re nearing completion. If you’re unsure, touch the top of the dough; it should feel firm but still have a slight give. Trusting your nose saves you from overbaking and preserves the bars’ moisture.
The 5-Minute Rest That Changes Everything
After removing the bars from the oven, let them rest in the pan for five minutes. This pause allows the residual heat to finish setting the interior, preventing the bars from becoming gummy when sliced. It also gives the powdered sugar a chance to set, ensuring a crisp coating that doesn’t crumble when you cut into the bars.
How to Keep Them Fresh Longer
Store the bars in an airtight container at room temperature for up to a week. If you plan to keep them longer, refrigerate them in a sealed bag; the cold will maintain the buttery texture and prevent the peanut butter filling from becoming too soft. When ready to eat, let them sit at room temperature for a few minutes to regain their original softness.
Reheating Without Losing Flavor
If your bars have cooled and lost a bit of their freshness, reheat them in a preheated 350°F oven for 5 minutes. The heat will revive the butter’s richness and restore the bars’ soft interior. Avoid microwaving, as it can cause uneven heating and a rubbery texture.
Creative Twists and Variations
This recipe is a playground. Here are some of my favorite ways to switch things up:
Chocolate Chip Overload
Fold in a cup of semi‑sweet chocolate chips into the dough before baking. The chocolate adds a burst of richness that complements the peanut butter, creating a chocolate‑peanut butter dream. The chips also add a delightful texture contrast. This version is perfect for chocolate lovers who want a sweeter bite.
Almond Butter Delight
Swap the peanut butter with almond butter for a nutty twist. The almond flavor pairs beautifully with the buttery crust and powdered sugar finish. This variation offers a slightly lighter taste and a different nutritional profile. It’s ideal for those who prefer a milder, less sweet flavor.
Maple Syrup Swirl
Add a splash of pure maple syrup to the peanut butter mixture for a subtle maple undertone. The syrup enhances the sweetness while giving the bars a glossy sheen. The maple also adds a hint of caramel, making the bars feel like a holiday treat. This version works well during the fall and winter months.
Sea Salt Crunch
Sprinkle a pinch of flaky sea salt over the powdered sugar before serving. The salty crunch contrasts with the sweet, buttery base, creating a balanced flavor profile. The sea salt also adds a subtle depth that elevates the overall taste. This variation is great for those who enjoy a sweet‑and‑salty combination.
Minty Freshness
Stir in a teaspoon of peppermint extract into the wet mixture before baking. The mint adds a refreshing note that pairs surprisingly well with the peanut butter. The bars will have a cool, invigorating finish, making them a perfect snack after a long day. This version is especially appealing during the warmer months.
Storing and Bringing It Back to Life
Fridge Storage
Place the bars in an airtight container and store them in the refrigerator for up to two weeks. The cold environment preserves the buttery texture and prevents the peanut butter from becoming overly soft. When ready to eat, let the bars sit at room temperature for 10 minutes to restore their original softness.
Freezer Friendly
Wrap each bar tightly in plastic wrap, then place them in a freezer bag. They can be frozen for up to three months without losing flavor or texture. Thaw them overnight in the fridge, then allow them to warm slightly before serving. This method is ideal for batch‑cooking and having a ready supply on hand.
Best Reheating Method
Reheat frozen bars in a preheated 350°F oven for 5–7 minutes, or until warmed through. Add a tiny splash of water to the bottom of the baking sheet before placing the bars; this creates steam that keeps the bars from drying out. Let them cool for a minute before cutting to maintain the buttery crust.