Why you'll love this recipe
- 30-minute treat for any craving
- Crowd-pleaser with nostalgic flavor
- Make-ahead friendly for busy mornings
- Kid-approved soft sponge and creamy filling
- Restaurant-quality at home without additives
I remember the kitchen was humming with the old refrigerator’s low whine while I whisked the eggs, the scent of vanilla curling around the copper bowl. When the first Twinkie slipped out of the pan, its golden top caught the morning light, and I tasted that childhood memory in a single bite. Later that week, I shared a batch with my sister’s kids, and their giggles confirmed I’d finally nailed the perfect homemade version. A few weeks later, during a rainy Sunday brunch, I plated them beside fresh strawberries and a steaming mug of coffee. The soft sponge gave way to the marshmallow cream, and the simple joy of that moment reminded me why I keep returning to this recipe—comfort, nostalgia, and a dash of kitchen magic.
The story
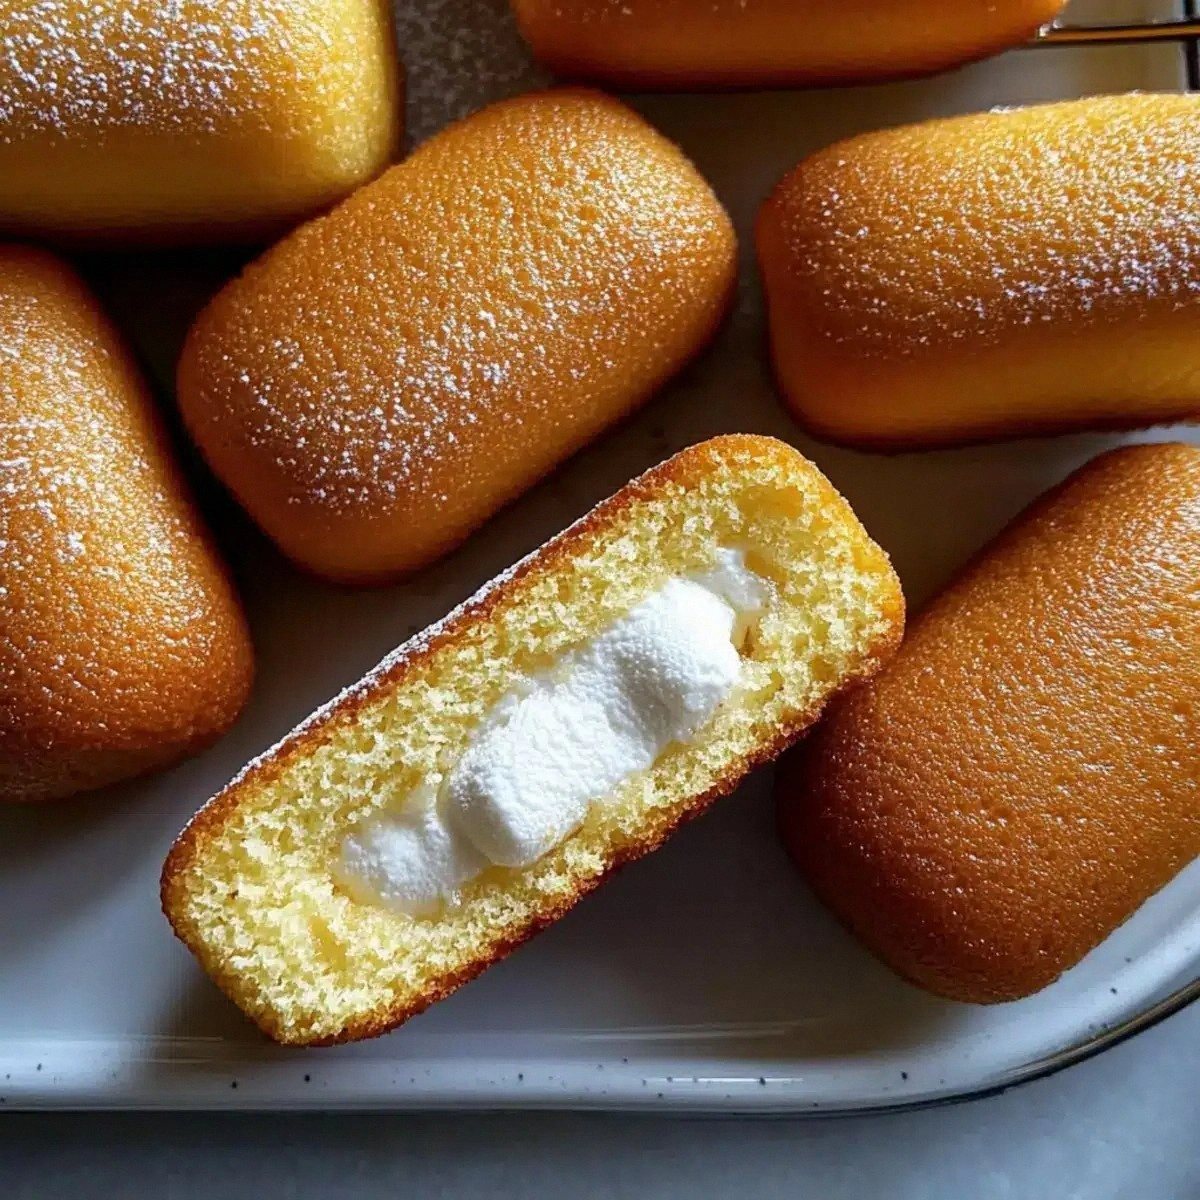
The moment the oven opens, a warm wave of vanilla‑sweet steam rushes out, and the golden tops of the Twinkies glisten like tiny sunrise cakes. A single bite releases a cloud of airy sponge that practically melts on your tongue, while the marshmallow‑cream center oozes sweet, buttery bliss. You can almost hear the soft sigh of the cake as it gives way to the filling.
I first tried to recreate Mom’s classic snack on a rainy Saturday when the pantry was empty except for a box of flour and a jar of marshmallow fluff. Watching the batter rise in the tiny pan felt like a tiny science experiment, and when the first Twinkie split open, the nostalgic flavor hit me like a warm hug. That moment sparked my obsession with perfecting the ultimate homemade version.
What sets this recipe apart is the gentle folding of the flour into a whipped egg‑sugar foam, a technique that traps air for an ultra‑light crumb. Instead of a heavy batter, we incorporate warm milk and melted butter at the end, creating a silk‑smooth texture that stays tender even after cooling. The addition of marshmallow crème to the filling gives a fluffy, melt‑in‑your‑mouth experience you won’t find in store‑bought versions.
The flavor journey starts with a subtle vanilla aroma, followed by a sweet, buttery cake that’s never soggy. The marshmallow filling adds a creamy, slightly caramelized note, while a whisper of salt balances the overall sweetness. Each bite offers a contrast of soft sponge and airy, melt‑away filling, delivering pure comfort in every mouthful.
These Twinkies shine at brunch tables paired with fresh berries and a splash of cold milk, or they can be sliced and layered with ice cream for an indulgent sundae. They also travel well for picnics, birthday parties, or as a make‑ahead treat for a quick snack on busy mornings. Serve them alongside a cup of coffee for a retro café vibe.
Don’t let the multiple steps intimidate you—most of the work is just timing and gentle folding, which anyone can master with a whisk or stand mixer. The total hands‑on time is under 30 minutes, and the bake is a quick 12‑15 minutes, so you’ll have fresh Twinkies before the day’s hustle catches up. Trust the process and you’ll be amazed at how simple it feels.
I’ve baked this batch countless times, tweaking the filling until it was just the right fluffiness, and my kids now swear they’ll trade any dessert for a homemade Twinkie. Even my grandmother, a true snack connoisseur, declared these the best she’d ever tasted, proving that a little technique goes a long way. Ready to bake? Let’s get started.
Why This Recipe Works
- Folding dry flour into the whipped egg‑sugar mixture preserves air for a fluffy crumb.
- Incorporating warm milk and melted butter gently heats the batter, preventing a dense texture.
- Piping the filling through a bottom hole ensures even distribution without breaking the delicate sponge.
Ingredient notes & substitutions
all-purpose flour
Provides the structure that holds the airy crumb together.
eggs
Whipped with sugar to create a light, leavened batter.
granulated sugar
Adds sweetness and helps stabilize the foam during whipping.
marshmallow creme
Gives the filling its signature fluffy, melt‑in‑the‑mouth texture.
unsalted butter (softened)
Creates a rich, smooth base for the creamy filling.
Equipment you'll need
Ingredients
- 1 cup all-purpose flour (consider a gluten-free flour blend for a different twist)
- 1 teaspoon baking powder (ensure it’s fresh for the best results)
- 1/4 teaspoon salt (enhances overall flavor)
- 4 large eggs (room temperature for better fluffiness)
- 1 cup granulated sugar (can replace some with a sugar alternative)
- 1 teaspoon vanilla extract (switch to vanilla bean paste for more flavor)
- 2 tablespoons milk (almond milk works well for a dairy-free option)
- 1 tablespoon unsalted butter (melted, coconut oil can be used as an alternative)
- 1/2 cup unsalted butter (softened, skipping substitutions is best)
- 1/2 cup marshmallow creme (homemade marshmallow fluff makes a great swap)
- 1 cup powdered sugar (reduce for a less sweet experience)
- 1 teaspoon vanilla extract (adjust according to personal preference)
- 1 tablespoon heavy cream (half-and-half can lighten the mix)
Before You Start
- Preheat oven to 350°F
- Soften butter for filling
- Separate eggs into whites and yolks
- Line Twinkie pan with parchment
- Gather all ingredients
Instructions
- 1Step 1
Preheat your oven to 350°F (175°C) and grease your Twinkie pan lightly.
- 2Step 2
Sift together all-purpose flour, baking powder, and salt in a small bowl and set aside.
- 3Step 3
In a large mixing bowl, beat eggs and granulated sugar on high speed until thick and fluffy.
- 4Step 4
Gently mix in vanilla extract and then fold the dry mixture into the egg mixture gradually.
- 5Step 5
Combine warm milk and melted butter in a separate bowl, then fold into the batter.
- 6Step 6
Pour the batter into the prepared molds, filling each about 3/4 full, and bake for 12–15 minutes.
- 7Step 7
Cool cakes in the pan for 5 minutes before transferring to a wire rack to cool completely.
- 8Step 8
Beat softened butter until fluffy, then mix in marshmallow creme, powdered sugar, vanilla extract, and heavy cream.
- 9Step 9
Using a piping bag, carefully poke holes at the bottom of each cooled cake to fill with the creamy filling.
Pro tips
Bring eggs to room temp
Room‑temperature eggs whip faster and trap more air for a fluffier cake.
Sift dry ingredients
Sifting eliminates lumps and ensures even distribution of flour and leavening.
Do not overmix batter
Gentle folds keep the air bubbles intact, preventing a dense texture.
Fill molds 3/4 full
Leaving space allows the cakes to rise without spilling over the pan edges.
Cool in pan briefly
A 5‑minute rest lets the cakes set, making them easier to remove.
Pipe filling through bottom hole
Creating a small hole in each cake ensures the filling spreads evenly inside.
Cover filling tightly
A sealed container prevents a skin from forming and keeps the cream soft.
Variations to try
Gluten‑Free Twinkies
Swap the all‑purpose flour for a gluten‑free blend; the texture remains light.
Dairy‑Free Creamy Filling
Use coconut cream and dairy‑free butter; the marshmallow flavor still shines.
Chocolate Swirl Version
Add 2 tbsp cocoa powder to the batter for a rich chocolate‑marshmallow twist.
Holiday Peppermint Twist
Mix a few drops of peppermint extract into the filling and sprinkle red confetti before serving.
Serving Suggestions
Troubleshooting
Cake collapsed
Do not overmix the batter and ensure the oven temperature is accurate; a gentle fold keeps structure.
Filling too runny
Whip the butter longer and add a bit more powdered sugar until the cream holds peaks.
Batter too thick
Add a splash more milk, one tablespoon at a time, until it reaches a pourable consistency.
Cakes stuck to pan
Lightly grease the pan and let the cakes cool in the pan for only 5 minutes before transferring.
Storage & make-ahead
Refrigerator
Store in an airtight container for up to 4 days; keep cakes and filling separate.
Freezer
Freeze individually wrapped cakes for up to 2 months; thaw in the fridge overnight before filling.
Best way to reheat
Warm in a 300°F oven for 5‑7 minutes or microwave 10 seconds; add a dab of butter to keep them moist.
Make-ahead
Bake the sponge a day ahead; prepare the filling up to 2 days before assembly.
Ingredients
- 1 cup all-purpose flour (consider a gluten-free flour blend for a different twist)
- 1 teaspoon baking powder (ensure it’s fresh for the best results)
- 1/4 teaspoon salt (enhances overall flavor)
- 4 large eggs (room temperature for better fluffiness)
- 1 cup granulated sugar (can replace some with a sugar alternative)
- 1 teaspoon vanilla extract (switch to vanilla bean paste for more flavor)
- 2 tablespoons milk (almond milk works well for a dairy-free option)
- 1 tablespoon unsalted butter (melted, coconut oil can be used as an alternative)
- 1/2 cup unsalted butter (softened, skipping substitutions is best)
- 1/2 cup marshmallow creme (homemade marshmallow fluff makes a great swap)
- 1 cup powdered sugar (reduce for a less sweet experience)
- 1 teaspoon vanilla extract (adjust according to personal preference)
- 1 tablespoon heavy cream (half-and-half can lighten the mix)
Instructions
- 1Preheat your oven to 350°F (175°C) and grease your Twinkie pan lightly.
- 2Sift together all-purpose flour, baking powder, and salt in a small bowl and set aside.
- 3In a large mixing bowl, beat eggs and granulated sugar on high speed until thick and fluffy.
- 4Gently mix in vanilla extract and then fold the dry mixture into the egg mixture gradually.
- 5Combine warm milk and melted butter in a separate bowl, then fold into the batter.
- 6Pour the batter into the prepared molds, filling each about 3/4 full, and bake for 12–15 minutes.
- 7Cool cakes in the pan for 5 minutes before transferring to a wire rack to cool completely.
- 8Beat softened butter until fluffy, then mix in marshmallow creme, powdered sugar, vanilla extract, and heavy cream.
- 9Using a piping bag, carefully poke holes at the bottom of each cooled cake to fill with the creamy filling.