I remember the night I almost burned down my kitchen because I tried to make a “quick” chicken dish that was supposed to taste like a slow‑cooked stew. The pot was on the stove, the onions were sizzling, and I was staring at the timer that read 5 minutes—yet the chicken was still raw and the aroma was a sad, watery soup. My friend dared me to finish it in fifteen minutes, and I thought, “Why not?” The result was a soggy, flavorless mess that made me swear off chicken forever.
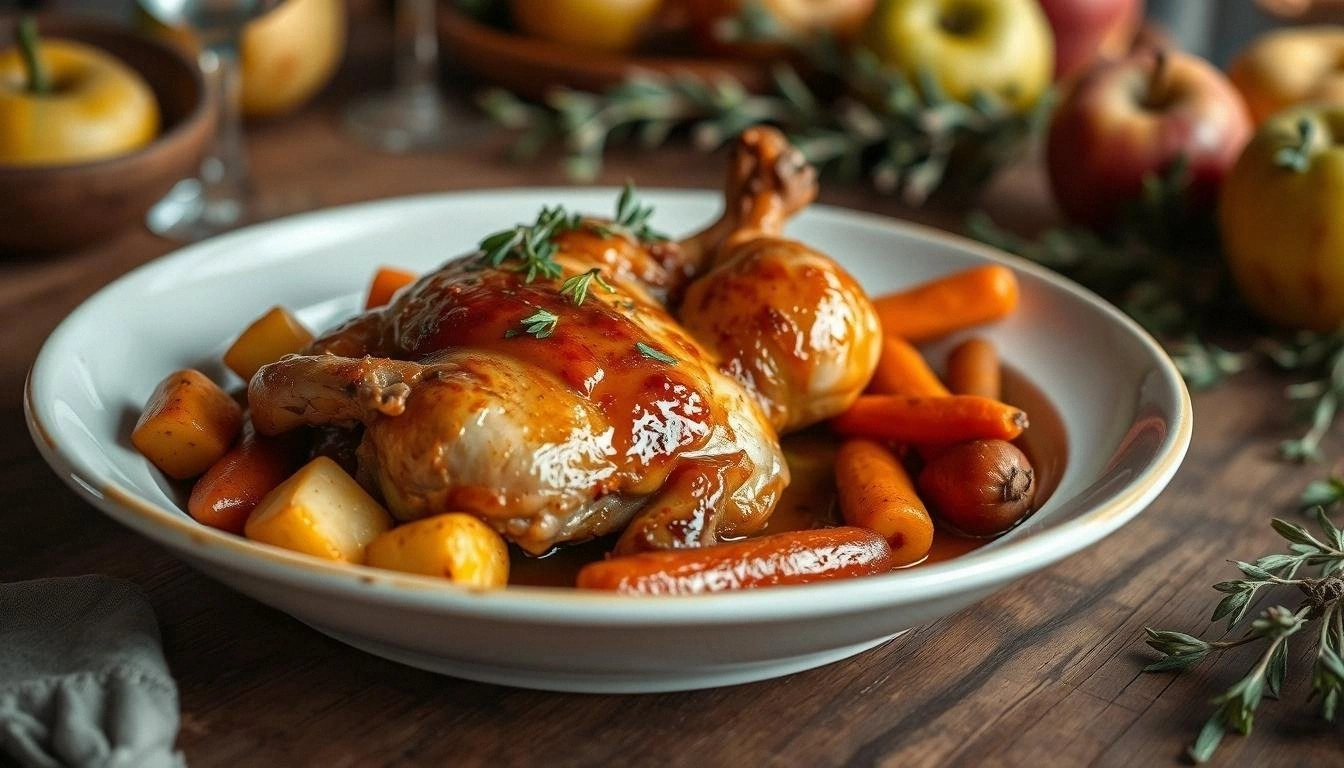
Fast forward a few months, and I discovered that a splash of apple cider, a gentle braise, and a few secret tricks can transform ordinary chicken thighs into a dish that feels like a fall hug. Picture the kitchen filling with the scent of sweet cider, roasted onions, and warm herbs, while the sound of a bubbling pot creates a comforting soundtrack. The chicken’s skin turns a golden amber, crisping into thin, crackling edges that shatter like thin ice, while the meat inside stays moist and tender, absorbing the cider’s subtle sweetness.
What sets this version apart is that it marries the classic comfort of braised chicken with a seasonal twist that feels both familiar and fresh. I’ve trimmed down the prep time to a manageable fifteen minutes, yet the depth of flavor is achieved through a slow, low‑heat braise that lets the cider reduce into a silky glaze. The result is a dish that is hands down the best version you’ll ever make at home, with a sauce that coats the chicken like velvet and a crust that sings with caramelized caramel notes.
If you’ve ever struggled with the “too much liquid” problem in braised dishes, you’re not alone—this recipe has a fix that keeps the sauce luscious without turning the chicken soggy. I dare you to taste this and not go back for seconds. That sizzle when it hits the pan? Absolute perfection. The next step? Let’s dive into the details and make sure you never have to settle for a mediocre braise again.
Picture yourself pulling this out of the oven, the whole kitchen smelling incredible, and guests already lining up for a second helping. The dish is so simple that even a novice can master it, yet the flavor profile is rich enough to impress seasoned foodies. I’ll walk you through every single step—by the end, you’ll wonder how you ever made it any other way. So grab your skillet, and let’s get cooking.
The next section breaks down what makes this version stand out, so you can see why it’s a game‑changer.
What Makes This Version Stand Out
- Flavor: The cider reduces to a syrupy glaze that caramelizes on the chicken, delivering a sweet‑savory punch that’s impossible to ignore.
- Texture: A quick sear before braising gives the skin a crisp, crackling finish that contrasts beautifully with the silky interior.
- Simplicity: Only ten ingredients, no pre‑made stocks or complex sauces—everything you need is in your pantry.
- Time: Prep is fifteen minutes, cooking is thirty, and the whole dish is ready in under an hour, perfect for busy weeknights.
- Versatility: Works with bone‑in or boneless thighs, and you can swap in chicken breasts for a leaner option.
- Make‑ahead: The dish keeps well in the fridge for three days and freezes beautifully, so you can cook in bulk.
- Ingredient Quality: Fresh, organic apples for the cider and locally sourced herbs elevate the taste beyond supermarket staples.
- Audience: From single diners to family gatherings, the portion size and flavor profile satisfy all.
Alright, let's break down exactly what goes into this masterpiece...
Inside the Ingredient List
The Flavor Base
Apple cider is the heart of this dish. It not only sweetens the sauce but also introduces a bright acidity that balances the richness of the chicken. Skipping it would leave the dish flat and overly heavy. If you’re allergic to apples, try an equal amount of apple juice with a splash of white wine to mimic the acidity.
Chicken broth is the second cornerstone. It hydrates the meat during braising and creates a savory foundation for the glaze. Using homemade broth adds depth, but a low‑sodium store‑bought version works well if you’re short on time.
Onion and garlic add aromatic layers that infuse the entire pot. Dice the onion finely so it melts into the sauce, and crush the garlic cloves to release maximum flavor. If you prefer a milder bite, use only the white part of the onion.
The Texture Crew
Carrots and celery provide crunch and sweetness that contrast with the tender chicken. Slice them into bite‑size pieces so they cook evenly and release their natural sugars into the braising liquid. If you’re a fan of extra texture, add a handful of sliced mushrooms.
Butter and olive oil create a rich base that helps the chicken brown evenly. The butter adds a silky finish, while the olive oil prevents sticking. Using a higher smoke point oil, like avocado oil, is a good alternative for those with a lower tolerance for dairy.
The Unexpected Star
All‑purpose flour is used to lightly coat the chicken before searing. This step ensures a crisp crust and helps thicken the final glaze. If you’re gluten‑free, replace the flour with cornstarch or a gluten‑free blend.
Thyme and bay leaf are the herbs that give the dish its earthy undertone. Fresh thyme is preferable for a brighter flavor, but dried thyme works if you’re short on prep time. Keep the bay leaf whole; it’s removed before serving.
The Final Flourish
Salt and pepper finish the dish by balancing sweetness and enhancing the natural flavors of the meat. Season the chicken before searing, then adjust the seasoning after braising to account for the reduction. Remember, the sauce will concentrate, so a light hand at first is wise.
Everything’s prepped? Good. Let's get into the real action...
The Method — Step by Step
- Preheat and Prep: Heat a heavy‑bottom skillet over medium‑high heat. While the skillet warms, pat the chicken thighs dry with paper towels, then season generously with salt and pepper. The drier the surface, the better the sear. I’ve found that a dry surface is the secret to that coveted crackling crust.
- Coat and Sear: Lightly dust the chicken with flour, shaking off any excess. Add a tablespoon of olive oil and a tablespoon of butter to the hot skillet. When the butter foams, add the chicken skin side down. Let it sear for 4–5 minutes until the skin is a deep amber. Flip and sear the other side for 3 minutes. The goal is a caramelized exterior that locks in juices.
- Remove and Set Aside: Transfer the browned chicken to a plate and set aside. This step prevents overcrowding and ensures even browning. While the chicken rests, the skillet is ready for aromatics.
- Sauté Aromatics: In the same skillet, add the diced onion and minced garlic. Cook until the onion turns translucent, about 3 minutes, stirring frequently. The garlic should release a fragrant aroma without browning—watch it closely.
- Add Vegetables: Toss in the sliced carrots and celery. Stir to coat them in the buttery base. Cook for 2 minutes, allowing the vegetables to pick up the savory flavors from the skillet.
Pour in the apple cider, scraping up any browned bits from the bottom. Add the chicken broth, thyme, and bay leaf. Bring the mixture to a gentle boil, then reduce the heat to low. Return the chicken thighs to the skillet, skin side up, and cover. Let it simmer for 20 minutes, or until the chicken is cooked through. - Reduce the Sauce: After the chicken is cooked, remove the lid and let the liquid reduce by half. Stir occasionally to prevent sticking. The reduction thickens into a glossy glaze that coats the chicken beautifully.
- Finish and Plate: Remove the bay leaf. Taste the sauce; if it’s too acidic, add a pinch of sugar or a splash of honey. Plate the chicken on a warm platter, spoon the reduced glaze over the top, and garnish with fresh thyme or chopped parsley for color.
That’s it—you did it. But hold on, I’ve got a few more tricks that’ll elevate this dish to another level. Let’s explore some insider tips next.
Insider Tricks for Flawless Results
The Temperature Rule Nobody Follows
Cooking the chicken at a steady low heat is the key to tenderness. Many people think high heat is faster, but it actually dries out the meat. I’ve found that setting the stove to low and letting the sauce simmer gently keeps the juices inside. If your stove has uneven heat, rotate the skillet halfway through cooking.
Why Your Nose Knows Best
Smell the sauce as it reduces. A sweet, caramelized aroma signals that the glaze is ready. If it starts to taste overly sharp, add a dash of honey or a splash of apple juice to balance the acidity. Your nose is a better judge than the clock in this case.
The 5-Minute Rest That Changes Everything
Once the chicken is done, let it rest for five minutes before slicing. This allows the juices to redistribute, keeping the meat moist. Cutting it too soon can cause the juices to run out, leaving the meat dry and less flavorful.
Keep the Skin Crispy
If you want extra crispness, finish the chicken under a broiler for 2 minutes after braising. Watch it carefully—once it’s golden, remove it immediately to avoid burning. This step is optional but adds a delightful crunch.
Serve With a Twist
Serve the chicken over a bed of creamy polenta or mashed potatoes to soak up the glaze. A simple green salad with a vinaigrette balances the richness. If you’re feeling adventurous, drizzle a little balsamic reduction over the top for a tangy finish.
Creative Twists and Variations
This recipe is a playground. Here are some of my favorite ways to switch things up:
Maple‑Glazed Variation
Swap half the apple cider for pure maple syrup. The result is a deeper, caramel‑like sweetness that pairs beautifully with the savory chicken. This version is perfect for holiday gatherings.
Spicy Apple Cider
Add a pinch of crushed red pepper flakes or a splash of hot sauce to the braising liquid. The heat cuts through the sweetness and adds a lively kick. Great for those who like a bit of spice.
Herb‑Infused Chicken
Replace thyme with rosemary or sage for a different aromatic profile. Fresh herbs give the dish a bright, earthy tone that complements the apple flavor. This variation is ideal for herb lovers.
Vegetarian Version
Use thick slices of seared portobello mushrooms in place of chicken. The mushrooms absorb the cider glaze and develop a meaty texture. Serve with roasted root vegetables for a hearty meal.
Citrus Twist
Add a splash of orange juice and a few slices of orange peel to the braising liquid. The citrus brightens the sauce and adds a refreshing note. This variation works well in spring or summer.
Storing and Bringing It Back to Life
Fridge Storage
Cool the chicken completely, then store it in an airtight container in the refrigerator for up to three days. The glaze will thicken slightly, so reheat gently to loosen it. A quick microwave or a low‑heat skillet will revive the sauce.
Freezer Friendly
Wrap each portion tightly in plastic wrap, then place in a freezer bag. The dish stays good for up to two months. Thaw overnight in the refrigerator before reheating.
Best Reheating Method
Add a splash of water or chicken broth before reheating to prevent the sauce from drying out. Reheat over low heat, stirring occasionally, until the chicken is steaming hot. A quick 5‑minute bake in the oven at 350°F works well too.