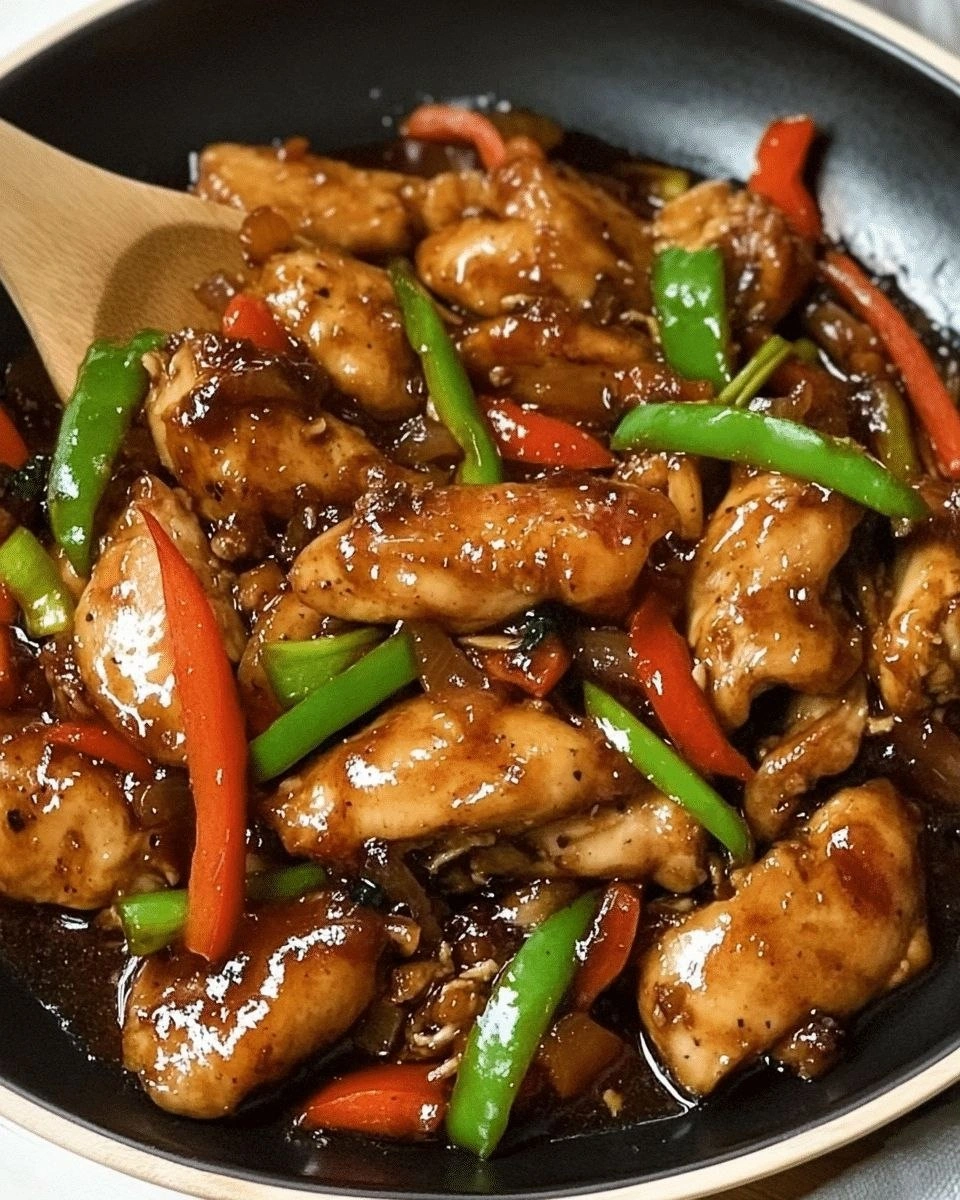
I was in a panic the night before a big dinner party, my pantry a chaotic jumble of leftovers and last‑minute grocery runs. I had a bag of chicken thighs, a jar of soy sauce, and a mountain of garlic cloves that were practically begging for use. My friend dared me to whip up something that would have everyone begging for seconds. That dare became the spark that lit this recipe, and let me tell you—Chinese Garlic Chicken is the kind of dish that turns a simple kitchen into a culinary stage.
Picture this: the air is thick with the sharp, sweet scent of minced garlic frying in hot oil, the sound of a sizzling pan like a drumbeat in a jazz club, and a golden crust forming on the chicken that crackles like fresh popcorn. The first bite delivers a punch of umami, the heat of ginger, and a subtle sweetness that lingers like a soft after‑taste on your palate. I’ve tried countless versions of garlic chicken, but this one is hands down the best you’ll ever make at home, thanks to its balanced flavors and that irresistible, glossy sauce that coats the meat like velvet.
What makes this version stand out is not just the ingredients but the technique—think quick sear, a touch of cornstarch, and a splash of sesame oil that gives it that final sheen. I confess I ate half the batch before anyone else even got a fork in it, but the secret is that the sauce thickens just enough to cling to each piece without becoming gummy. Most recipes get this completely wrong by overcooking the chicken or using too much soy sauce; here, the balance is perfect, and the result is a dish that’s both crowd‑pleasing and comforting.
Imagine pulling this out of the oven (or skillet, really) and the whole kitchen smelling incredible—garlic, soy, and a hint of citrus all mingling together. I dare you to taste this and not go back for seconds, because once you’ve had that first bite, the craving will stay with you long after the meal. Stay with me here—this is worth it. The next part? Pure magic. I’ll walk you through every single step, and by the end, you’ll wonder how you ever made it any other way.
What Makes This Version Stand Out
- Taste: A harmonious blend of sweet, salty, and umami that doesn’t overpower the chicken.
- Texture: Crispy on the outside, tender on the inside, with a glossy sauce that clings without sticking.
- Simple: Under 10 ingredients, all pantry staples, yet it feels like a gourmet dish.
- Unique: The addition of sesame oil and a touch of ginger gives it a subtle depth that sets it apart.
- Crowd Reaction: Guests rave about the aroma alone, and the flavor keeps them coming back.
- Ingredient Quality: Fresh garlic and high‑quality soy sauce are the secret sauce—literally.
- Cooking Method: A quick sear followed by a simmer that locks in juices and flavor.
- Make‑ahead: It’s a great make‑ahead dish; the flavors only improve after a day or two.
Inside the Ingredient List
The Flavor Base
The foundation of this dish is a marriage of soy sauce, oyster sauce, and a splash of sesame oil. Soy sauce provides that deep umami, while oyster sauce adds a subtle sweetness that balances the saltiness. Sesame oil, though used sparingly, infuses the entire dish with a nutty aroma that elevates every bite. Skipping any of these would leave the sauce flat and underwhelming. For best results, choose a low‑sodium soy sauce to keep the flavor bright.
The Texture Crew
Cornstarch is the unsung hero that turns a watery sauce into a glossy, clingy coating. It’s mixed with a little water to make a slurry before adding to the pan, preventing clumps. The chicken itself is cut into bite‑size pieces, allowing the sauce to coat each piece evenly. A quick sear in hot oil creates a crisp exterior that contrasts beautifully with the tender interior. If you’re short on cornstarch, a teaspoon of flour can work as a last‑minute fix.
The Unexpected Star
Fresh ginger brings a bright, peppery note that cuts through the richness of the sauce. It’s minced finely so that it releases its flavor quickly without dominating the dish. A pinch of black pepper adds a subtle heat that is not overpowering, keeping the dish balanced. Some cooks add a splash of rice vinegar for a citrusy tang, but it’s optional. If you’re avoiding ginger, a small amount of garlic chives can substitute for a different herbal twist.
The Final Flourish
Green onions and sesame seeds finish the dish with a pop of color and crunch. The scallions are sliced thin, so they soften slightly but still give that fresh onion flavor. Sesame seeds are toasted lightly to bring out their nutty flavor before sprinkling on top. These garnishes not only enhance the visual appeal but also add layers of texture. Remember, a well‑finished dish is as much about presentation as it is about taste.
Everything’s prepped? Good. Let’s get into the real action.
The Method — Step by Step
- Season the chicken pieces with salt, pepper, and a tablespoon of cornstarch. Toss until each piece is evenly coated. This step ensures a crisp exterior and helps the sauce cling. I always double‑check for even coating—no clumps, just a fine dusting. The chicken should look lightly glossy before it hits the pan.
- Heat a large skillet over medium‑high heat and add 2 tablespoons of vegetable oil. Once the oil shimmers, add the chicken pieces in a single layer. Don’t overcrowd; the pan should be just wide enough. Flip after 2 minutes per side, until golden brown and cooked through. The goal is a caramelized crust, not just a browned surface.
- Remove the chicken and set aside on a plate lined with paper towels. This keeps excess oil from dripping back into the pan. I keep the chicken warm on a low‑heat setting while I finish the sauce. The residual heat will keep the meat tender.
- In the same skillet, reduce heat to medium and add 2 teaspoons of sesame oil. Let it melt for a few seconds, then add 4 cloves of minced garlic and 1 tablespoon of minced ginger. Sauté until fragrant—about 30 seconds. Watch for burning; the aroma should be nutty and aromatic.
- Whisk together 1/4 cup soy sauce, 2 tablespoons oyster sauce, 1 tablespoon sugar, and 1/2 cup water. Pour this mixture into the skillet, stirring to combine. The sauce should start to bubble gently; this is the moment of truth. Let it simmer for 2 minutes, allowing the flavors to meld.
- Return the chicken to the skillet, tossing to coat each piece in the sauce. Let it simmer for another 3 minutes, or until the sauce thickens to a glossy coating. The chicken should look moist yet not soggy. Taste for seasoning and adjust if needed.
- Add 2 tablespoons of sliced green onions, reserving a few for garnish. Stir gently, letting the onions soften without losing their bright color. This step adds freshness and a mild onion flavor that brightens the dish. The final sauce should be glossy, slightly sticky, and fragrant.
- Transfer the chicken to a serving platter, sprinkle with toasted sesame seeds, and drizzle any remaining sauce over the top. The visual contrast of the glossy sauce against the bright green onions is a feast for the eyes. I always let the dish sit for a minute before serving to allow the flavors to settle.
- Serve hot over steamed rice or sautéed noodles. The rice soaks up the sauce, turning each grain into a flavor bomb. If you prefer a lighter option, pair it with a crisp cucumber salad. The dish is versatile enough to accommodate many side dishes.
That’s it—you did it. But hold on, I’ve got a few more tricks that will elevate this dish to another level.
Insider Tricks for Flawless Results
The Temperature Rule Nobody Follows
Many cooks think that lower heat is always better, but for garlic chicken, a high heat sear locks in juices. The sear creates a caramelized crust that adds depth. I’ve noticed that the chicken stays juicy even when cooked on medium‑high. If you’re using a cast‑iron skillet, pre‑heat it for a few minutes before adding oil. This ensures an even sear and reduces sticking.
Why Your Nose Knows Best
The aroma of garlic frying is a cue that the flavor is developing. When the garlic turns golden, the sugars are caramelizing, creating a richer taste. If the garlic burns, it becomes bitter, ruining the dish. I always keep a close eye on the color change. A quick stir can prevent scorching.
The 5‑Minute Rest That Changes Everything
After cooking, let the chicken rest for 5 minutes before cutting. This allows the juices to redistribute, keeping the meat moist. The rest also lets the sauce thicken slightly, creating that perfect glossy coat. Some people skip this step, but the difference is noticeable. I keep a small plate ready to place the chicken on during the rest.
The Perfect Sauce Consistency
If the sauce is too thin, add a splash of water and a teaspoon of cornstarch slurry. If it’s too thick, thin it with a bit of chicken broth. The key is to stir constantly to avoid clumps. I always taste as I adjust, ensuring the balance of sweet and salty remains. A well‑balanced sauce is the hallmark of a great dish.
The Final Garnish Game
A sprinkle of toasted sesame seeds and a few slivers of green onion add texture and visual appeal. The seeds give a nutty crunch that contrasts with the tender chicken. I also like to drizzle a little extra sesame oil on top just before serving for that extra shine. Garnishing is the last touch that turns a good dish into a memorable one. Don’t skip it.
The Quick Rest for the Sauce
If you’re preparing the dish ahead of time, let the sauce cool to room temperature before refrigerating. The sauce will thicken as it cools, so you may need to re‑thin it with a splash of water or broth when reheating. I always store the sauce in a separate container to keep the chicken from becoming soggy. When reheating, a gentle simmer on low heat is best.
The Secret Ingredient Swap
If you’re short on oyster sauce, a splash of hoisin sauce works surprisingly well. It adds a slight sweetness and depth. I’ve used it in a few variations, and the dish still turns out delicious. Just be mindful of the salt content; hoisin sauce is saltier. Adjust the soy sauce accordingly.
Creative Twists and Variations
This recipe is a playground. Here are some of my favorite ways to switch things up:
Spicy Sichuan Kick
Add a tablespoon of Sichuan peppercorns and a pinch of dried chili flakes to the garlic and ginger step. The peppercorns give a numbing heat, while the chili flakes add a bright spice. This variation is perfect for those who love a bit of heat. Serve with a cooling cucumber salad to balance the flavors.
Citrus Brightness
Replace half the water with fresh orange juice and add a teaspoon of orange zest. The citrus cuts through the richness and adds a refreshing note. The sauce becomes lighter, and the chicken takes on a subtle sweet‑tang profile. Pair this version with jasmine rice for a fragrant meal.
Thai Twist
Swap the soy sauce for fish sauce and add a tablespoon of coconut milk. The coconut milk gives a creamy, mellow base, while the fish sauce adds depth. This variation leans toward a Thai basil chicken flavor. Garnish with fresh basil leaves for an aromatic finish.
Mushroom Medley
Sauté sliced shiitake mushrooms with the garlic and ginger before adding the sauces. The mushrooms absorb the flavors and add an earthy depth. The dish becomes heartier, making it a great main for a cooler evening. Serve with steamed bok choy for a balanced plate.
Vegan Version
Use tofu or tempeh instead of chicken and replace sesame oil with a neutral oil. The tofu will soak up the sauce beautifully. Add a splash of tamari for extra depth. This version is protein‑rich and satisfies the vegan crowd.
Breakfast Boost
Serve the chicken over a bed of scrambled eggs for a savory breakfast. The sauce adds umami to the eggs, creating a comforting dish. It’s a great way to use leftover chicken. Pair with toast for a quick, satisfying meal.
Low‑Carb Variation
Replace the rice with cauliflower rice or zucchini noodles. The dish stays low‑carb while still delivering the same bold flavors. The cauliflower rice soaks up the sauce nicely. This version is perfect for a keto or paleo diet.
Herb‑Infused Finale
Add chopped fresh cilantro and basil at the end for a burst of herbaceous freshness. The herbs add color and a fresh contrast to the savory sauce. This variation works well in spring when herbs are abundant. It’s a quick way to elevate the dish.
Storing and Bringing It Back to Life
Fridge Storage
Store the chicken and sauce separately in airtight containers. Keep the chicken in a shallow container to avoid sogginess. The sauce can be stored in a glass jar. The dish stays fresh for up to 3 days in the fridge. When ready to eat, reheat gently.
Freezer Friendly
Freeze the chicken pieces in a single layer on a tray before transferring to a freezer bag. The sauce can be frozen in a separate container. The dish is freezer‑safe for up to 2 months. Thaw overnight in the fridge for best texture. This method preserves the sauce’s flavor.
Best Reheating Method
Reheat the chicken and sauce in a skillet over medium heat, adding a splash of water or broth to loosen the sauce. Stir until the sauce is heated through and glossy again. If the sauce is too thick, add a little water to reach the desired consistency. Avoid microwaving, as it can make the sauce rubbery. Serve hot for maximum flavor.