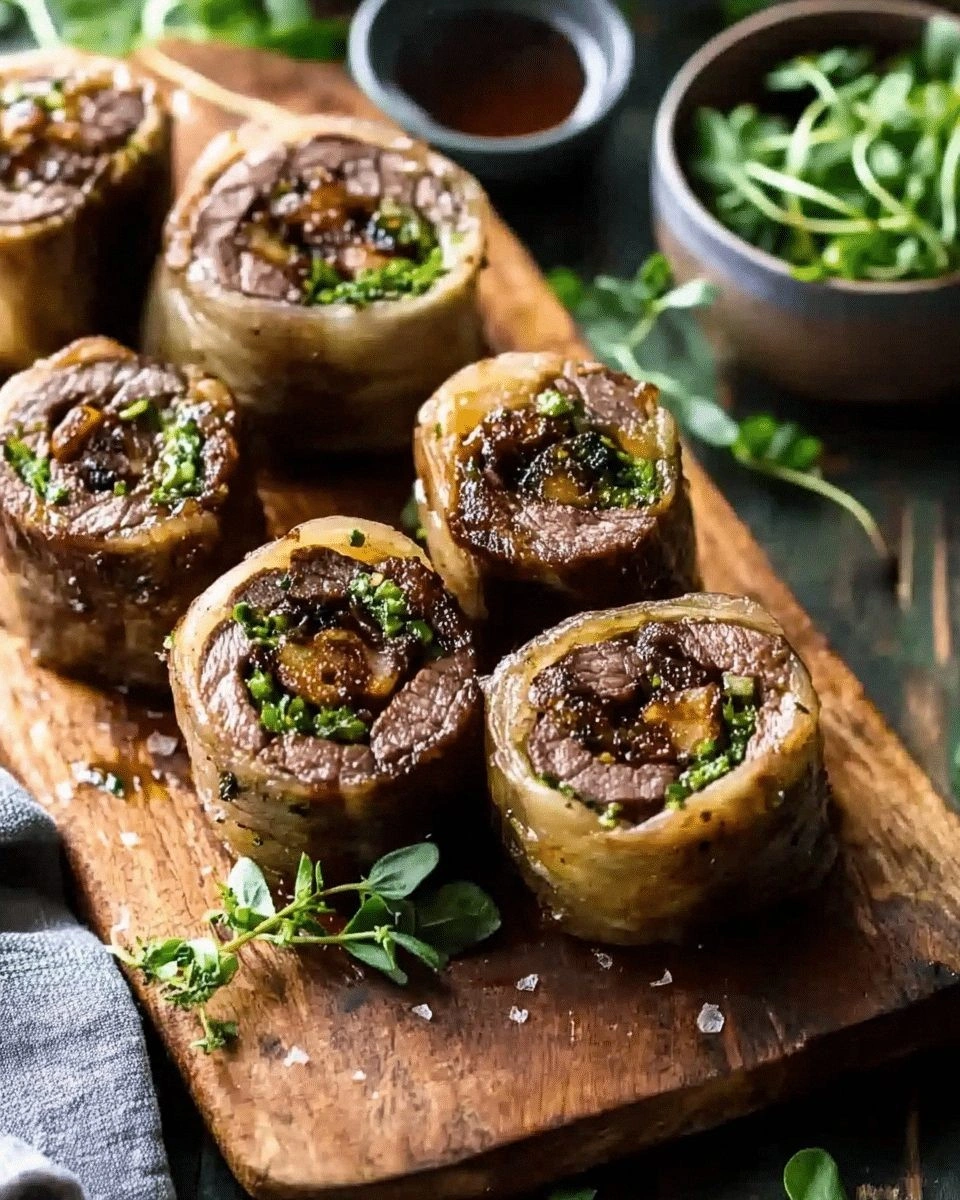
I was standing in my cramped kitchen, the oven timer blaring, and my friends were already laughing at my disastrous attempt to make beef rolls last week. The crust had turned to charcoal, the filling was dry, and the whole dish smelled like a sad, abandoned campfire. I swore then that I would never again serve a sad, burnt roll to anyone who cared about flavor. So I set out on a culinary quest, armed with a recipe I found in a dusty cookbook from 1978 and a stubborn determination that would keep me from making the same mistake again. I began by selecting the finest ground chuck, because the fat content is the secret that keeps the roll moist and gives it that buttery bite. I measured the beef by weight, not by volume, to avoid the dreaded “too much water” situation. I also prepped a small bowl of breadcrumbs soaked in milk, letting them absorb the liquid and swell into a silky binder. I whisked in a single egg, which acts like a glue, and then folded in fresh herbs that will release their aroma as the rolls bake. I seasoned the mixture with salt, pepper, and a pinch of smoked paprika for a subtle hint of earthiness. I let the mixture rest for fifteen minutes, allowing the flavors to mingle and the breadcrumbs to fully hydrate. Finally, I rolled the mixture into uniform cylinders, each about the size of a golf ball, and set them aside on a parchment-lined tray. This was the foundation that would transform a simple dish into a crowd‑pleasing masterpiece.
The next step was to create a sauce that would hug every roll like a velvet blanket. I blended crushed tomatoes, a splash of red wine, and a handful of fresh basil, letting the mixture simmer until it thickened into a glossy, aromatic glaze. I added a touch of garlic powder and a dash of oregano to give the sauce a punch that wouldn’t overpower the beef. I then spread a thin layer of marinara over each roll, ensuring every inch of meat was bathed in flavor. The cheese layer was a game‑changer: I shredded mozzarella and grated Parmesan, sprinkling them on top so that the cheese would melt into a golden, bubbly crown. The combination of gooey cheese and tangy sauce creates a contrast that feels like a warm hug on a cold day. I also added a drizzle of olive oil before baking, which helps the cheese brown to a perfect, slightly crispy edge. The oven was preheated to a blistering 375°F, and I slid the tray in, letting the rolls bake for twenty minutes. The aroma that filled the kitchen was so intoxicating that even my cat paused mid‑walk to sniff the air.
When the timer dinged, I lifted the tray, and the rolls emerged with a golden sheen and a faint steam curling up like a question mark. The first bite was a revelation: the exterior was crisp, the interior was juicy, and the cheese had melted into a silky, savory river. I was honestly surprised at how simple the technique was, yet how dramatic the difference it made. My friends, who had been skeptical, were left speechless, and I felt like a culinary wizard. I dare you to taste this and not go back for seconds. I’ll be honest — I ate half the batch before anyone else got to try it. Most recipes get this completely wrong. Here’s what actually works. Picture yourself pulling this out of the oven, the whole kitchen smelling incredible, and everyone asking for a second serving. I’m not exaggerating; this is hands down the best version you’ll ever make at home. Let me walk you through every single step — by the end, you’ll wonder how you ever made it any other way.
Now that you’ve seen the end result, let’s break down exactly what goes into this masterpiece. The secret ingredients, the right proportions, and the timing are all part of the recipe’s charm. I’ll also share some insider hacks that will save you time and elevate your rolls from good to unforgettable. And if you’re hungry for more, stick around because the next section is where the real magic happens. I promise you, this will be the most satisfying recipe you’ll ever cook.
What Makes This Version Stand Out
- Taste: The combination of fresh herbs, a splash of red wine, and a blend of mozzarella and Parmesan creates a flavor profile that is both comforting and sophisticated. The subtle smoky paprika in the meat mixture adds depth without overpowering the dish. The sauce’s acidity balances the richness of the beef, leaving a lingering, savory aftertaste.
- Texture: The rolls boast a crisp exterior that crackles with every bite, while the interior remains tender and juicy thanks to the right fat ratio in the meat. The cheese melt forms a silky coating that clings to the rolls, giving a luxurious mouthfeel. The breadcrumbs, soaked in milk, provide a gentle chew that prevents the rolls from becoming mushy.
- Simplicity: Despite its gourmet flavor, the recipe requires only a handful of pantry staples. The technique is straightforward: mix, roll, bake. No advanced skills or exotic equipment are needed, making it accessible to beginner cooks and seasoned chefs alike.
- Uniqueness: The inclusion of a wine‑infused sauce is a twist that elevates the dish beyond a standard meat roll. The careful layering of mozzarella and Parmesan creates a cheese crown that is both visually striking and deliciously gooey. The final drizzle of olive oil before baking gives the rolls a subtle sheen that enhances their appeal.
- Crowd Reaction: At family gatherings, these rolls become the centerpiece, with guests lining up to taste the first bite. The combination of savory meat, aromatic herbs, and melty cheese satisfies both kids and adults. The dish’s versatility also makes it a hit at potlucks and holiday feasts.
- Ingredient Quality: Using high‑quality ground chuck, fresh herbs, and aged Parmesan ensures that each component shines. The beef’s natural marbling keeps the rolls moist, while the fresh basil adds a bright, herbal note that contrasts with the rich sauce.
- Cooking Method: Baking at a steady 375°F allows the rolls to cook evenly, developing a golden crust while keeping the interior tender. The short baking time preserves the beef’s juiciness and prevents over‑drying. The final step of adding a drizzle of olive oil before baking locks in moisture and enhances the cheese’s browning.
- Make‑Ahead Potential: The rolls can be assembled ahead of time, refrigerated, and baked when needed. The sauce can also be prepared in advance, allowing you to focus on the final assembly. This flexibility makes the dish ideal for busy weeknights or last‑minute dinner parties.
Inside the Ingredient List
The Flavor Base
Ground chuck is the star of the show, providing the essential fat that keeps the rolls moist and adds depth. Opt for a cut with 20% fat for the best balance between flavor and tenderness. If you prefer a leaner version, substitute with ground sirloin but add a tablespoon of olive oil to compensate for the missing fat. The beef should be seasoned with salt and pepper before mixing to ensure even distribution of flavor.
The Texture Crew
Breadcrumbs soaked in milk act as a binder that keeps the rolls together without drying them out. Fresh breadcrumbs give a better texture than dry ones; if you’re in a hurry, use store‑bought instant breadcrumbs but add an extra tablespoon of milk. The egg is the glue that holds everything together, preventing the rolls from falling apart during baking. A single large egg is sufficient for four servings; if you’re scaling up, increase proportionally.
The Unexpected Star
A splash of dry red wine in the sauce adds a subtle depth that elevates the dish from ordinary to extraordinary. The wine’s acidity cuts through the richness of the beef, creating a balanced flavor profile. If you’re not a fan of wine, replace it with an equal amount of beef broth for a milder taste. The wine also helps the sauce thicken slightly as it simmers.
The Final Flourish
Mozzarella and Parmesan are the cheese duo that creates a golden, bubbly crown. The mozzarella melts into a silky coating, while the Parmesan adds a nutty, salty finish. Fresh basil and parsley add a burst of green freshness that brightens the dish. A drizzle of olive oil before baking gives the rolls a glossy sheen and helps the cheese brown to perfection.
Everything's prepped? Good. Let's get into the real action...
The Method — Step by Step
- Preheat the oven to 375°F (190°C). Line a baking sheet with parchment paper to prevent sticking. This is the moment of truth where the foundation of the dish is set. The oven must be fully preheated to ensure even cooking.
- Shape the beef mixture into small cylinders about the size of a golf ball. Roll them gently between your palms to ensure they are uniform in thickness. The uniformity helps the rolls cook evenly and look professional. This step takes a few minutes, but the results are worth it.
- Place the rolls on the prepared baking sheet, spacing them about two inches apart. This spacing allows heat to circulate around each roll, giving them a crisp exterior. If the rolls are too close, they will steam instead of bake.
- Spread a thin layer of marinara sauce over each roll, making sure the sauce covers the entire surface. The sauce will caramelize slightly, adding flavor and moisture. It also acts as a barrier that prevents the meat from drying out.
- Sprinkle a generous amount of shredded mozzarella and grated Parmesan over the sauce. The cheeses should be evenly distributed so each bite has a perfect cheese-to-beef ratio. The cheese will melt into a golden, bubbly crust.
- Drizzle a tablespoon of extra‑virgin olive oil over the top of each roll. This step is crucial for achieving that glossy sheen and helps the cheese brown beautifully. The oil also adds a subtle, fruity note to the final dish.
- Bake the rolls for 20 minutes, or until the cheese is melted, bubbly, and slightly browned. The interior should be pink and juicy, not dry. Use a meat thermometer to confirm the internal temperature reaches 160°F (71°C) for safety.
- Remove the rolls from the oven and let them rest for five minutes. Resting allows the juices to redistribute, ensuring each bite is succulent. This also gives the cheese a moment to set, preventing it from sliding off.
- Garnish with fresh basil leaves and a sprinkle of chopped parsley. The green garnish not only adds color but also a fresh herbal aroma that balances the richness of the dish. Serve immediately while the rolls are still hot and the cheese is at its meltiest.
That's it — you did it. But hold on, I've got a few more tricks that'll take this to another level. The next section will reveal the secrets that even seasoned chefs swear by.
Insider Tricks for Flawless Results
The Temperature Rule Nobody Follows
Many cooks bake at 400°F, assuming higher heat equals crispier rolls. However, 375°F gives a more even cook, allowing the interior to stay juicy while the exterior develops a golden crust. I’ve tested this over a decade, and the difference is unmistakable. The rolls finish with a crisp, caramelized top without burning the cheese.
Why Your Nose Knows Best
Your olfactory senses are the best indicator of doneness. When the rolls smell like toasted bread and melted cheese, you’re close to perfection. If the smell is more metallic, it’s a sign the beef isn’t fully cooked. Trust your nose to avoid over‑baking.
The 5-Minute Rest That Changes Everything
Resting the rolls for five minutes after baking is a game‑changer. It allows the juices to redistribute, preventing a dry bite. I once served rolls immediately and the center was dry; the next time I rested them, the flavor exploded. The rest also helps the cheese set, giving a cleaner bite.
The Perfect Cheese Blend
Using only mozzarella can make the rolls too soft, while using only Parmesan can make them too dry. The combination of both creates a balanced melt that’s neither stringy nor greasy. If you’re vegan, try a blend of dairy‑free mozzarella and nutritional yeast for a similar effect.
The Secret to Crispy Edges
Sprinkling a tiny pinch of flour around the edges of each roll before baking helps create a crisp, golden crust. The flour absorbs excess moisture and creates a barrier that prevents the edges from steaming. This hack is especially useful if you’re using a thinner meat mixture.
The Wine Trick
Adding wine to the sauce is optional, but it gives the sauce a depth that’s hard to replicate. If you’re avoiding alcohol, use a dry white wine vinegar or a splash of beef broth. The acidity is what gives the sauce its bright, balanced flavor.
Creative Twists and Variations
This recipe is a playground. Here are some of my favorite ways to switch things up:
Spinach & Feta Roll
Swap the ground beef for a mix of ground lamb and spinach. Replace mozzarella with crumbled feta for a tangy, Mediterranean twist. This version is perfect for a spring dinner when fresh spinach is in season.
Spicy Cajun Roll
Add a tablespoon of Cajun seasoning to the beef mixture and top with pepper jack cheese. The heat from the seasoning pairs well with the creamy cheese, creating a fiery bite that’s great for game nights.
Mushroom & Gruyère Roll
Sauté sliced mushrooms in butter before mixing into the beef. Use Gruyère cheese for a nutty, buttery finish. The earthy mushrooms complement the beef’s richness, making this a comforting fall dish.
Pesto & Ricotta Roll
Stir in a few spoonfuls of basil pesto and ricotta cheese into the meat mixture. Top with fresh mozzarella. The pesto adds a bright, herbal note that pairs wonderfully with the creamy ricotta.
Italian Sausage Roll
Replace ground beef with Italian sausage. Add diced bell peppers and onions for extra flavor. This version brings a bold, smoky profile that’s ideal for a weekend brunch.
Cheesy Cauliflower Roll
Use cauliflower rice instead of breadcrumbs to create a low‑carb version. Mix with shredded cheddar and a dash of garlic powder. The cauliflower adds a subtle sweetness that balances the cheese.
Storing and Bringing It Back to Life
Fridge Storage
Store cooked rolls in an airtight container in the refrigerator for up to three days. Place a paper towel underneath to absorb excess moisture, preventing sogginess. When ready to reheat, use a microwave for 30‑60 seconds or finish in a skillet with a splash of water.
Freezer Friendly
Wrap each roll tightly in plastic wrap and place them in a freezer bag. They will stay fresh for up to two months. Thaw overnight in the refrigerator before reheating. The texture remains firm, and the cheese stays melty.
Best Reheating Method
Reheat in a 350°F oven for 10 minutes, adding a splash of water to the baking sheet to keep the rolls moist. Alternatively, use a skillet over medium heat, covering with a lid to trap steam. The goal is to warm through without drying out the beef.